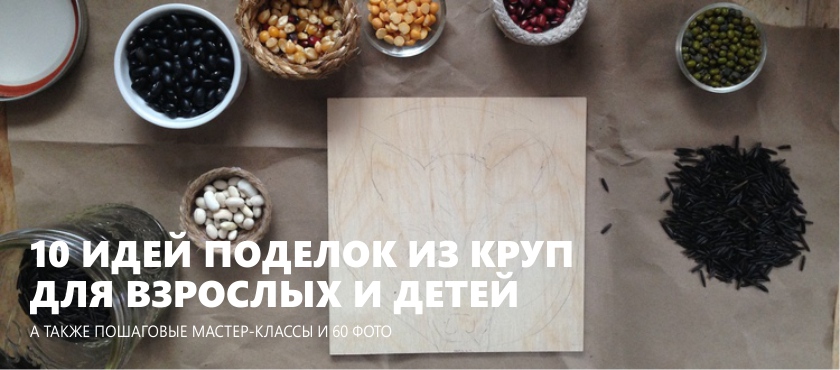
Sometimes in order to decorate a house or take a child with creativity, it is enough to look into the kitchen cabinet, where groceries are stored. After all, cereals, beans, spices, grains and seeds can be made in the style of eco or rustic, as well as developing children's crafts. The main thing - to show imagination and allocate some free time. In this material you will find 10 ideas and step-by-step instructions for making handicrafts of cereals for children and adults, as well as a master class on their coloring with food dyes.
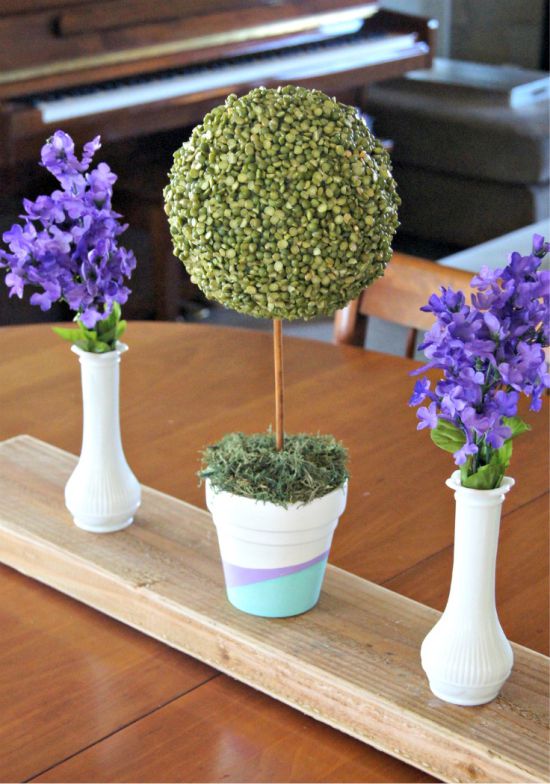
Idea 1. Topiary for table setting or interior decoration
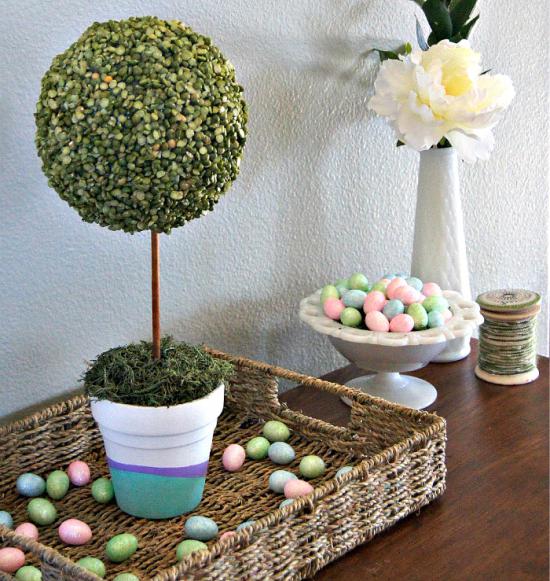
Beans of bright colors are an excellent material for decorating a crown or pot topiary. For example, from a green pea you can create such an ornamental tree for spring decoration of your house or table setting for Easter.
Materials:
- 1 pack of green peas (split and ground);
- The base ball of foam (sold in stores for needlework);
- 1 pack of dry moss (any other material will be suitable for topiary “soil” decor);
- 1 medium size clay pot;
- PVA glue and thermo-glue in the gun;
- Brush;
- 1 wooden stick, skewer or pencil (it will be a topiary barrel);
- Acrylic paint of green color (for painting of a ball in tone to peas);
- Paint the desired colors for pot decoration (optional);
- Polyfoam, floristic foam, or any solidifying mixture like cement or alabaster.
Master Class:
Step 1. If you are not satisfied with the look of your pot and / or barrel, paint them and leave to dry.
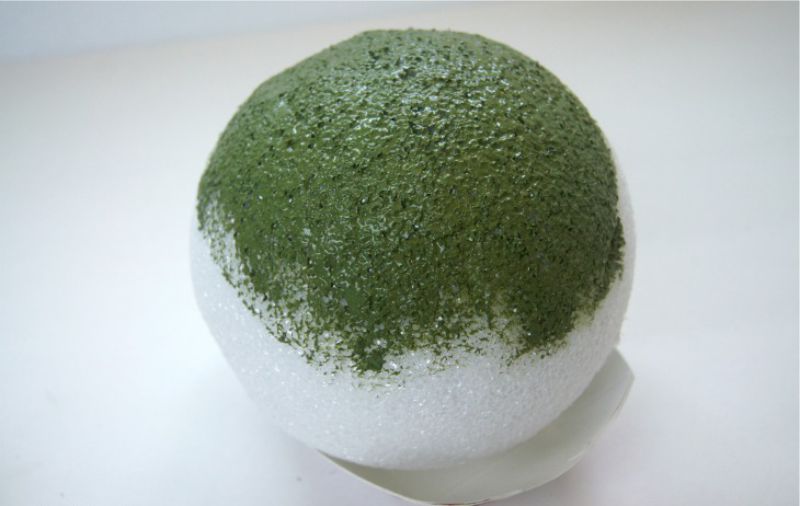
Step 2. While the pot dries, paint one half of the foam ball to match the beans and let it dry. When this happens, paint the other half of the ball and also leave it to dry.
Paint ball
Step 3. When the ball is completely dry, cut a hole in it for a trunk 2-3 cm deep with an awl or a knife.
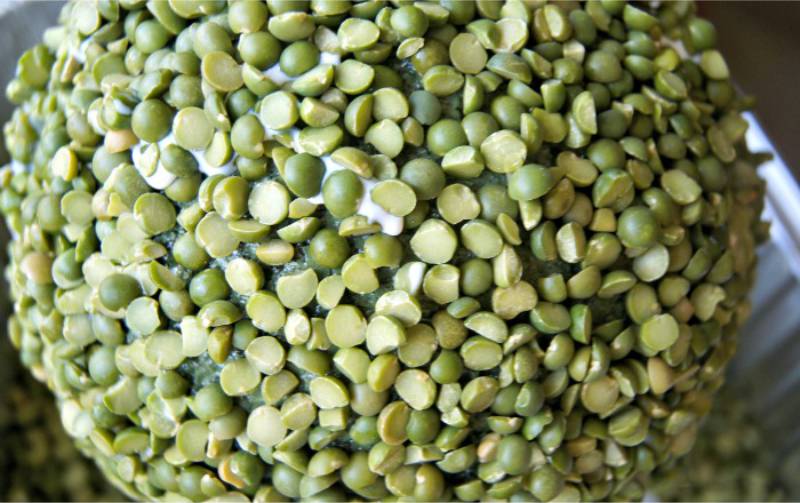
Step 4. Begin to decorate it with peas. To do this, put it on a plate, use a brush to apply PVA glue on a small area and sprinkle peas on it abundantly.
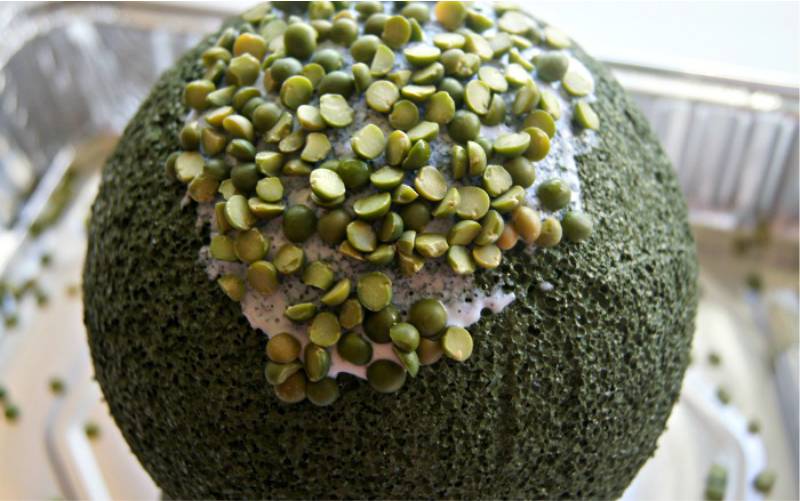
Pea Coating
Give this area a little dry and start sprinkling the next part of the ball. Continue the process until the whole ball is covered with green peas, and then leave it to dry overnight.
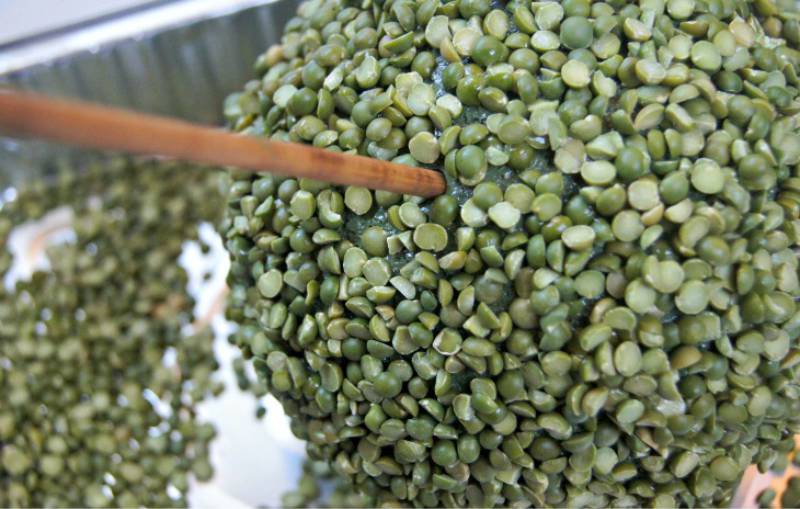
Step 5. When the resulting crown is dry, work on the spaces. For this you need to process the glue voids and again sprinkle them with grain.
Crown Topiary
Step 6. Now insert the barrel into the ball, pre-poured into a drop of thermal adhesive that was previously made. To keep the trunk tighter, around it you can lay pieces of paper and fill the hole with glue to the top.Keep in mind that without paper, the glue will melt the foam and deepen the hole too much. Finally, when the trunk is fixed, shape the area around it with peas (if necessary).
Trunk mount
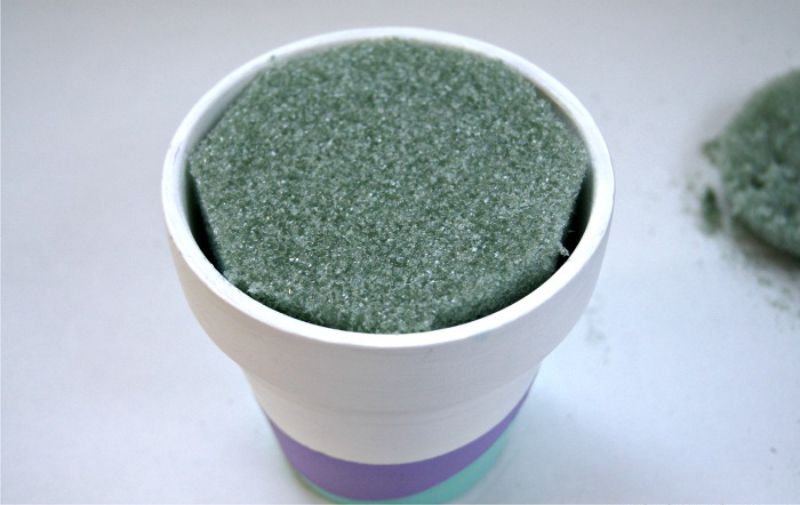
Step 7. Take care of creating a fixing "soil" in the pot. In this master class, floral foam was used to fix the tree. If you are also using foam or foam, then you only need to fit its size under the pot so that the tree will stand exactly and firmly. Otherwise, you can dilute any fixing composition according to the manufacturer's instructions.
You can read more about this stage in a separate master class on topiary manufacturing.
Step 8. When the base of the topiary is ready, you will only need to decorate it with moss, sisal, the same peas or any other cereal.
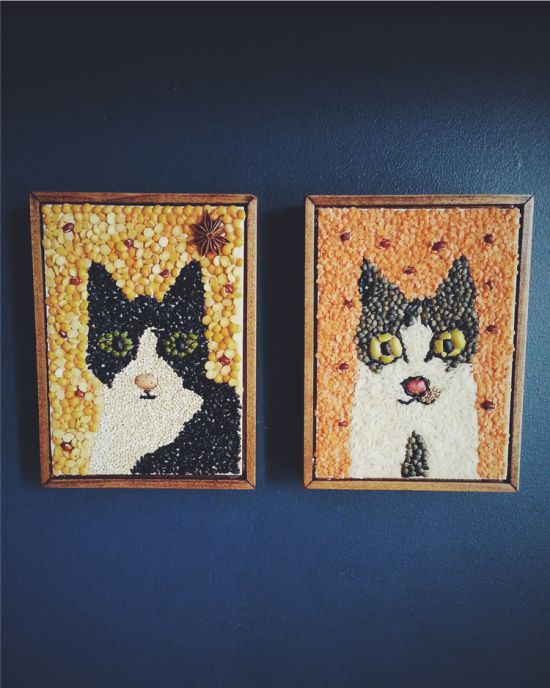
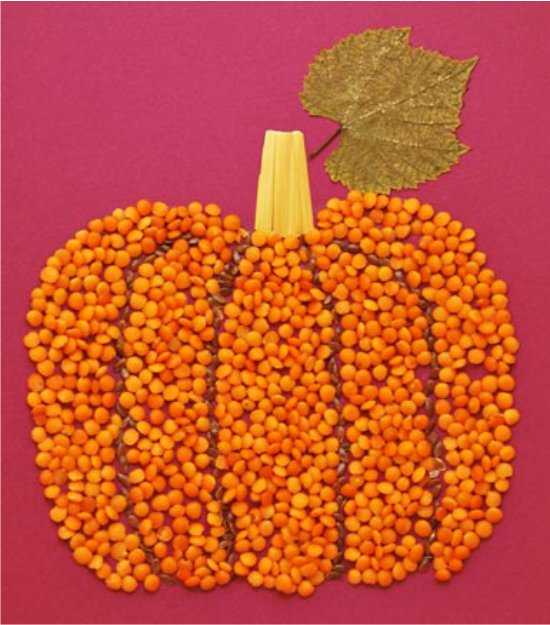
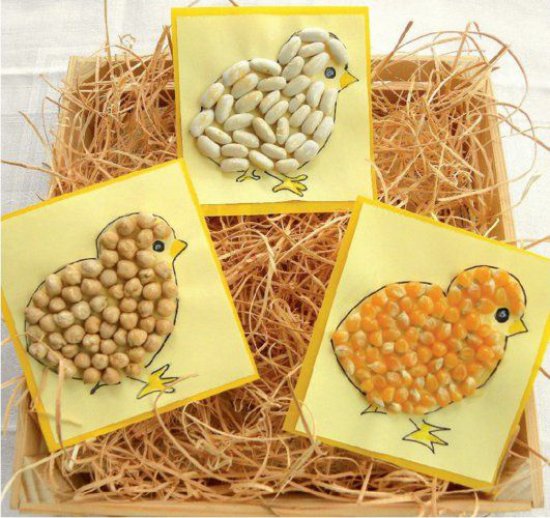
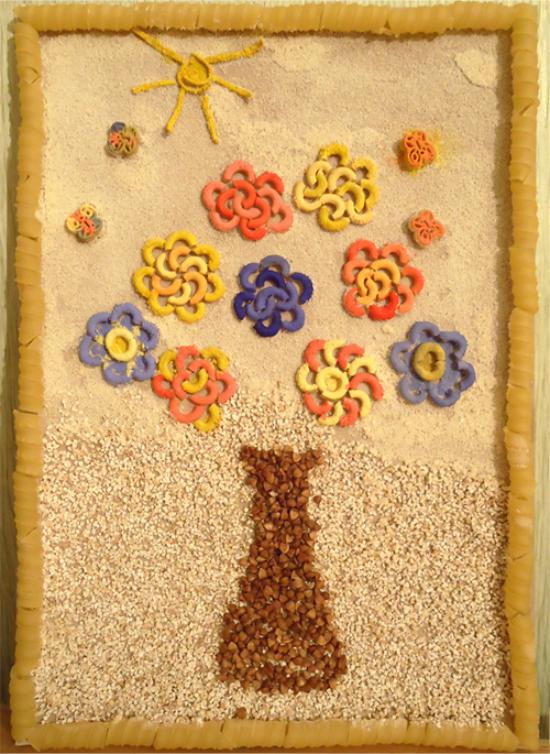
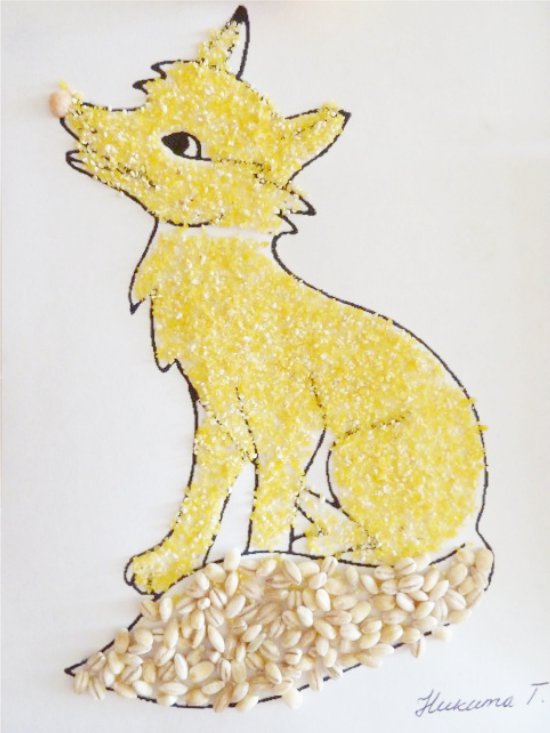
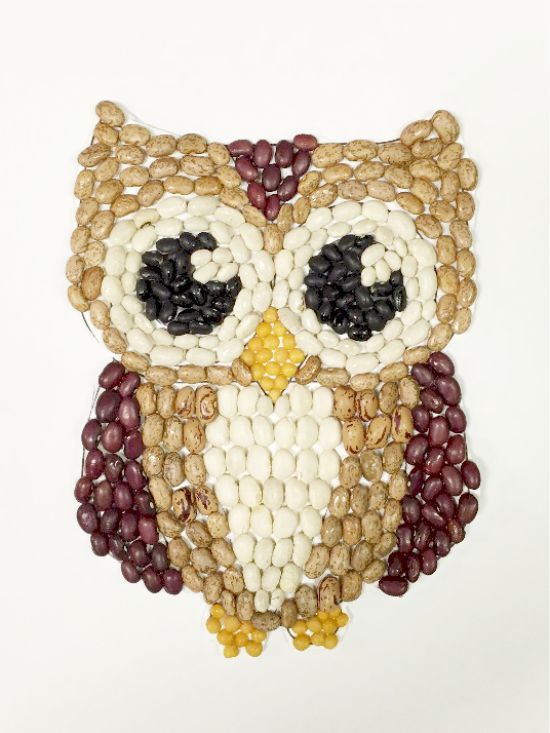
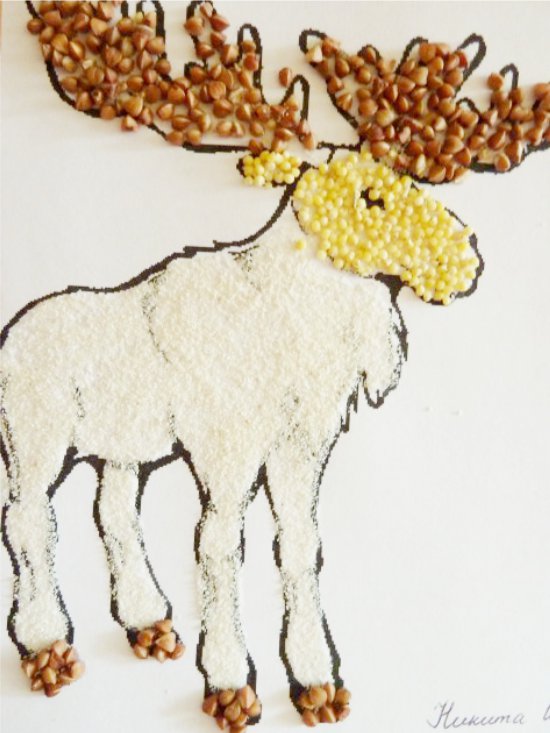
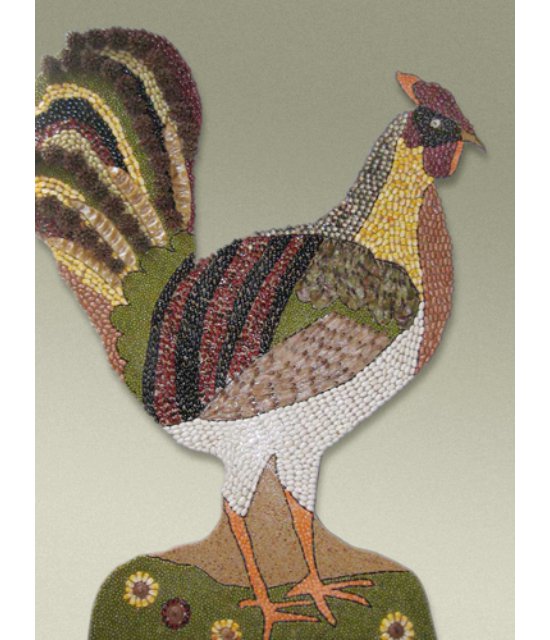
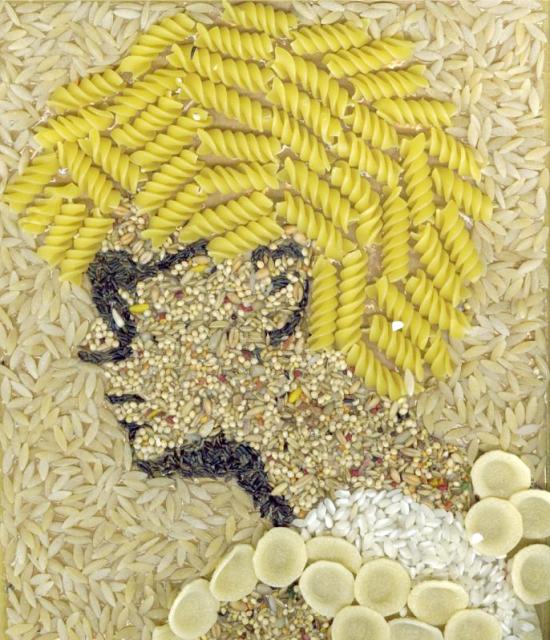
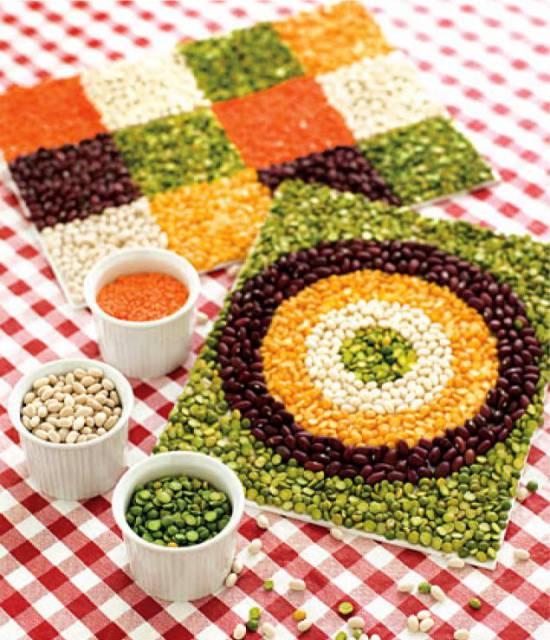
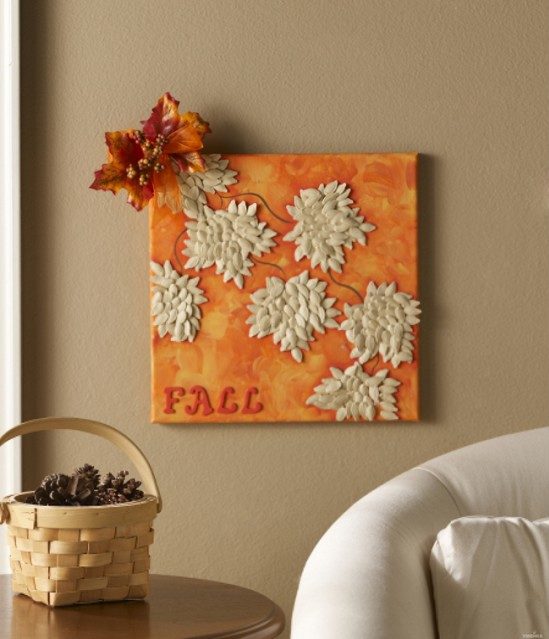
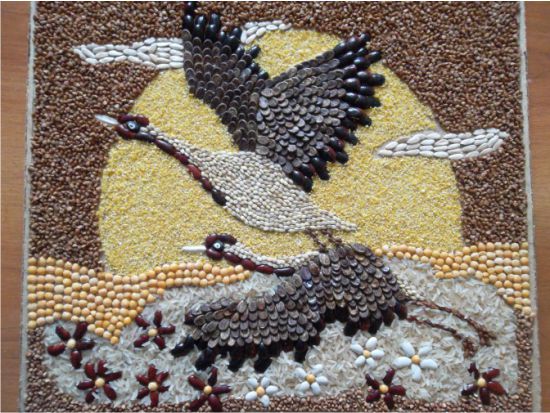
Idea 2. Panel or picture of cereals
Groats, beans, grains and seeds come in a variety of colors, which means that they can “paint” a picture or put together a mosaic panel. Depending on your ideas and artistic skills, the drawing can be more detailed or very sketchy.
In the next selection of photos are examples of children's handicrafts from cereals and pasta in the form of applications.
In the next video you can see the process of making applications of cereals with the baby.
And here is a selection of examples of panels and paintings from cereals, which you can do with your own hands to decorate the interior (scroll the photo to the right).

Materials:
- Various colored beans, cereals, seeds, pasta;
- PVA glue and glue brush;
- Dense and strong cardboard (for children's applications), a piece of plywood or canvas on a stretcher (for "adult" paintings);
- Sketch of the picture;
- Paint and brushes.
Master Class:
- Paint the background of the painting in the desired color.
- Pick up cereals that match the color of the selected pattern and sort them into slices.
- Draw by hand or transfer a sketch onto a cardboard, for example, through carbon paper or with a ready-made / home-made stencil.
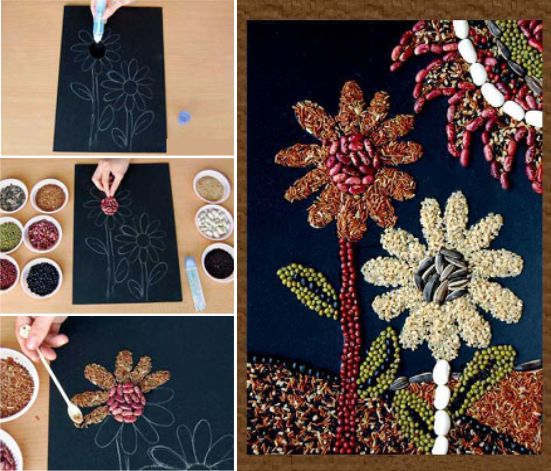
- Apply a thin layer of glue to a small area of the picture and immediately pour on it the grits of that color that correspond to the picture in this area. When the area dries out a little, remove the excess cereal and continue to “draw” the picture piece by piece so that the glue does not have time to dry.
- Remember that PVA glue dries completely in about 2 hours.
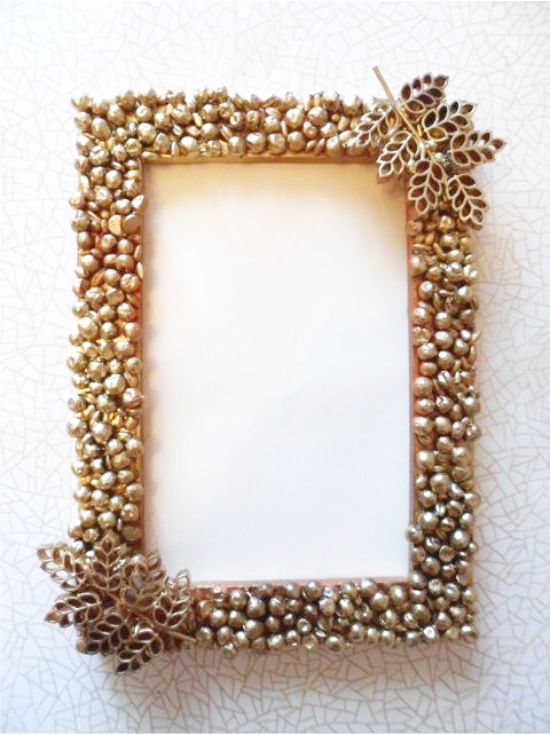
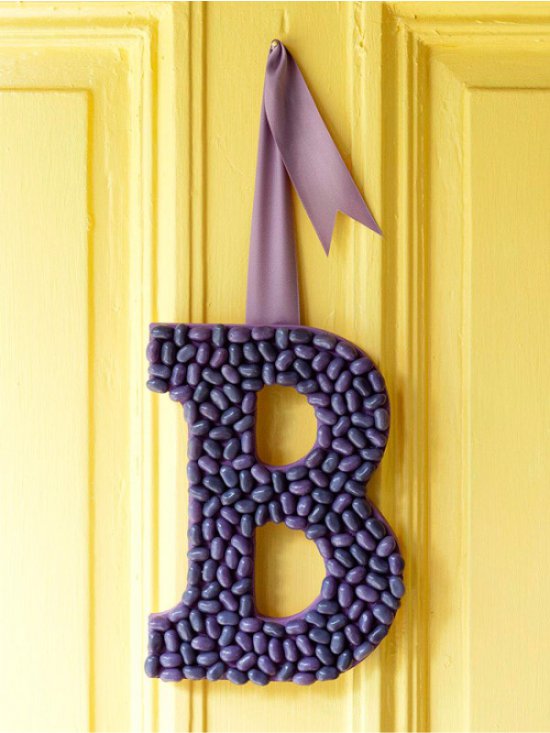
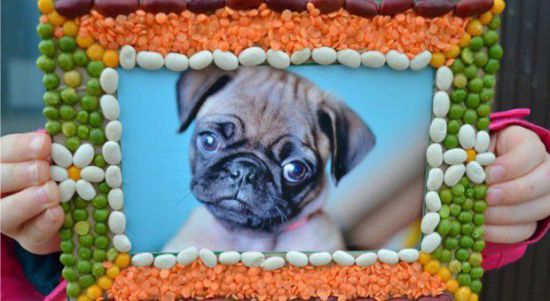
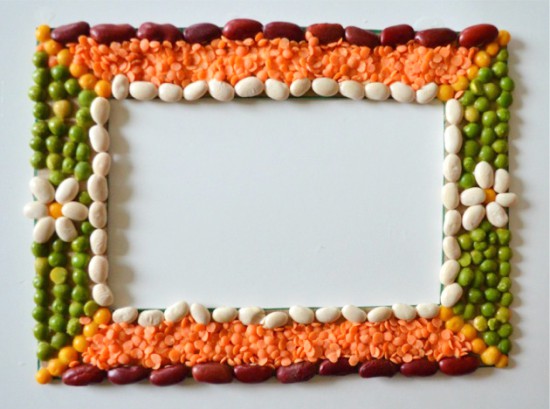
Idea 3. Decor frame
With the help of cereals, you can transform a simple frame for a photo, picture or mirror. You can fold the ornament of colored beans, or simply give the surface a relief, strewn with croup.
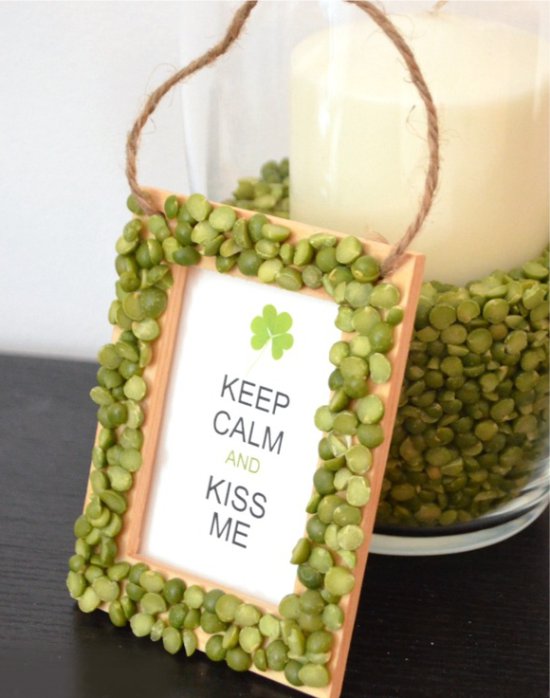
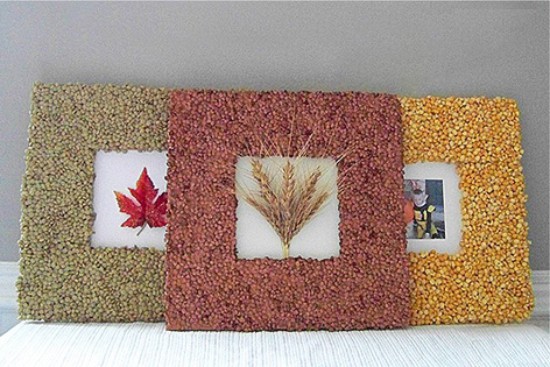
If desired, the frame itself and the grits can be painted with spray paint.
By the same principle, you can decorate with grain not only the frame, but also the interior letter as in the photo below. For the manufacture of such a letter were used: beans, purple paint in a can and a blank in the shape of the letter B, cut out of plywood jigsaw.
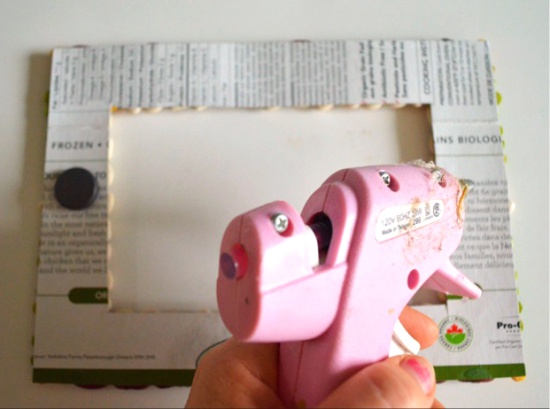
And here is the idea of handicrafts made from cereals for children - a frame-magnet for a refrigerator with an ornament made of colored beans.
To make such a pretty photo frame, you only need to cut out the frame blank from the cardboard, decorate it with colored beans on the mosaic principle, and then glue a couple of magnets to the inside.
See also the material: Making fridge magnets (and not only) from improvised, waste and natural materials
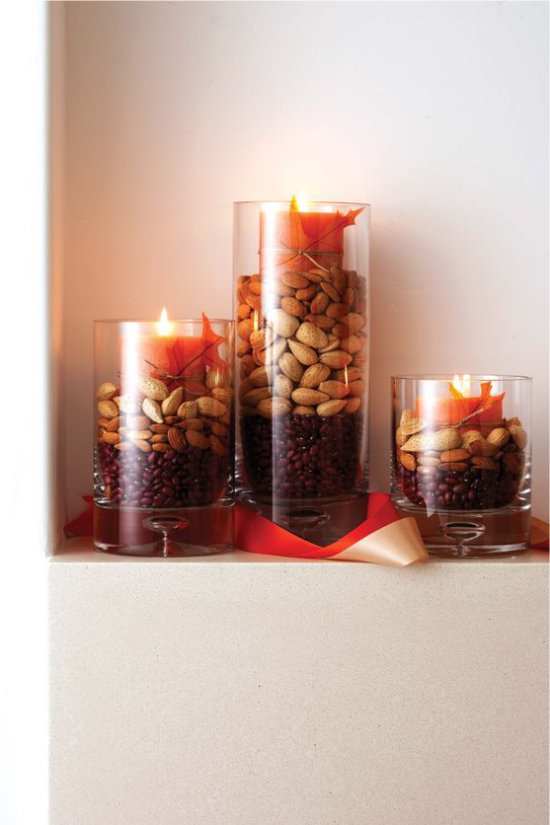
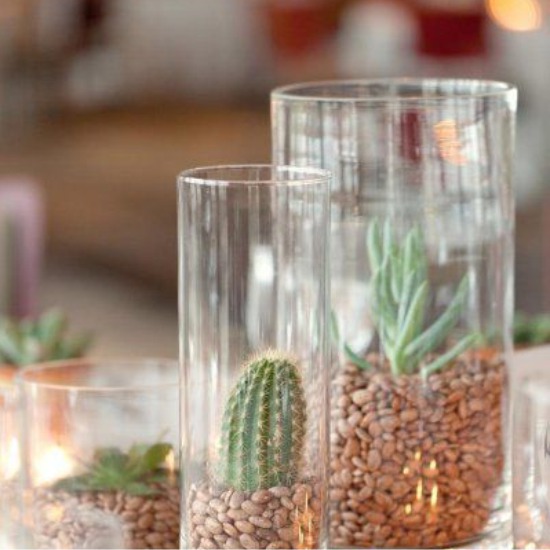
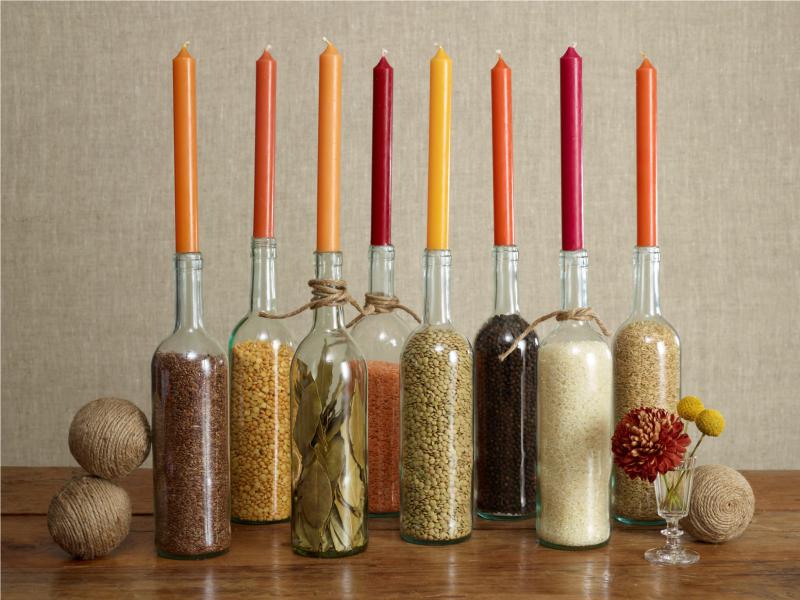
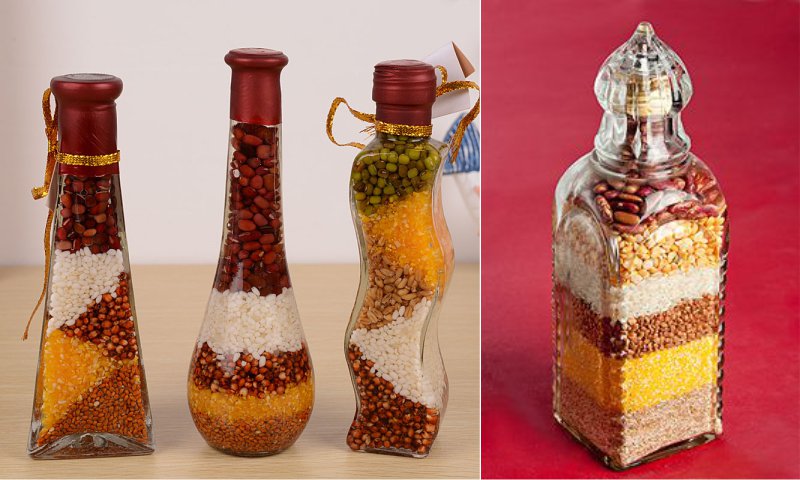
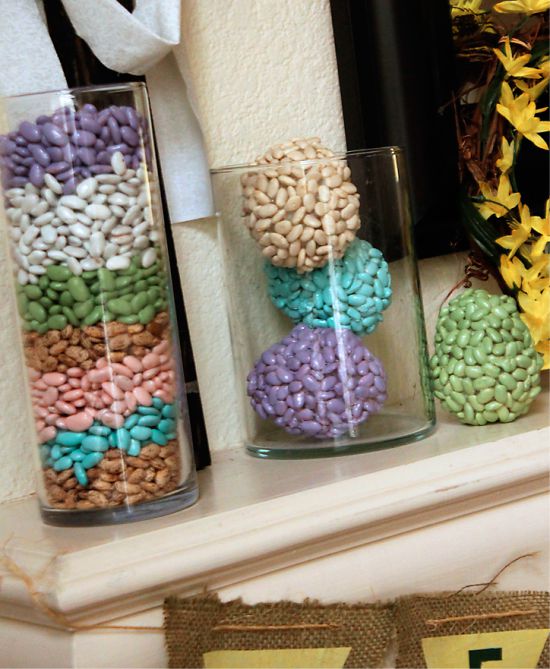
Idea 4. Decor of vases and bottles
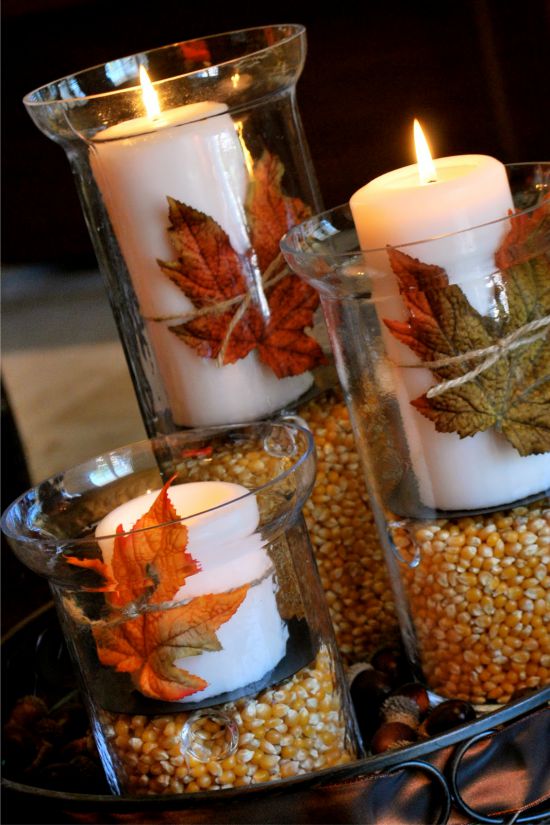
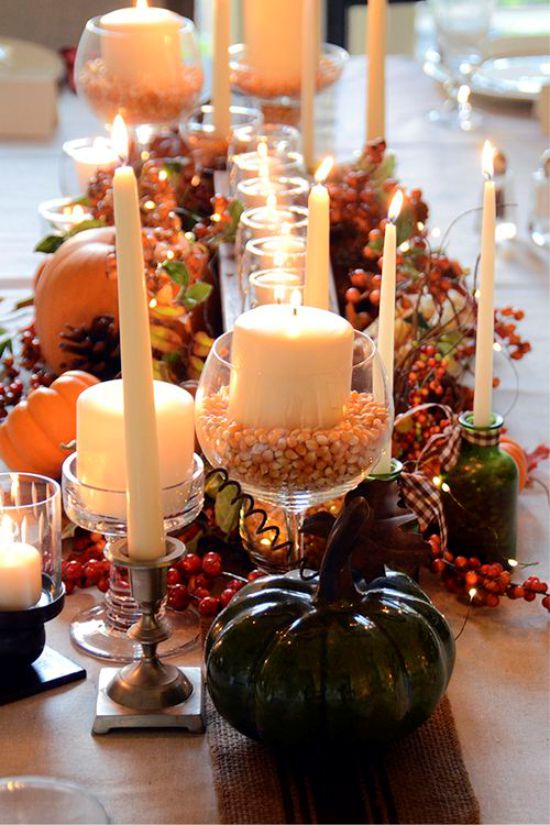
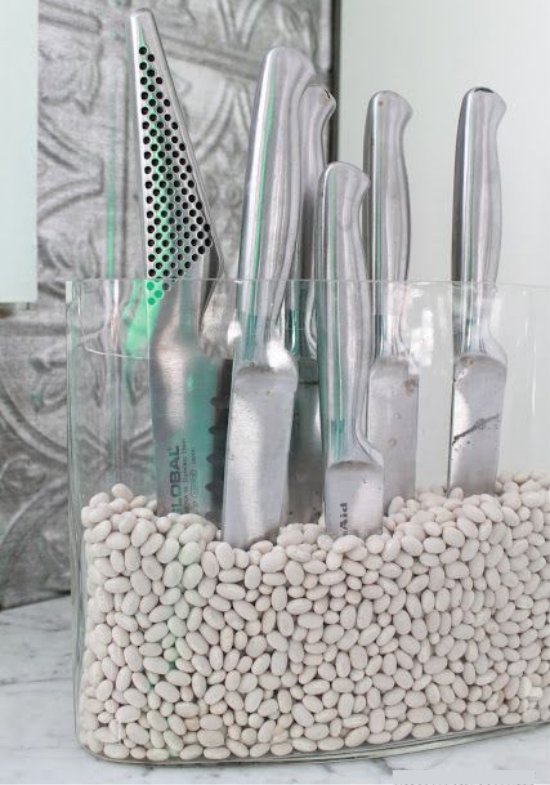
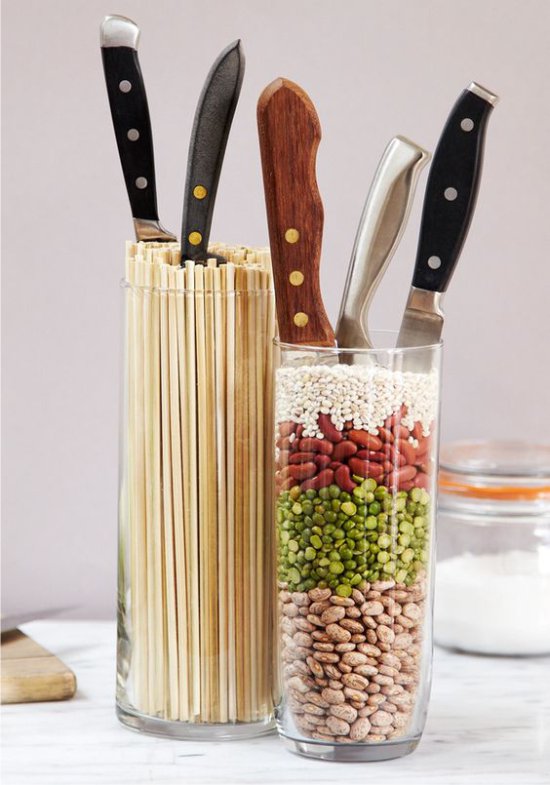
Cereals can be used as a decorative filler of glass vases and bottles for candles, artificial flowers, branches, dried flowers, makeup brushes, and even knives. The following photo selection presents examples of candlesticks in the autumn range.
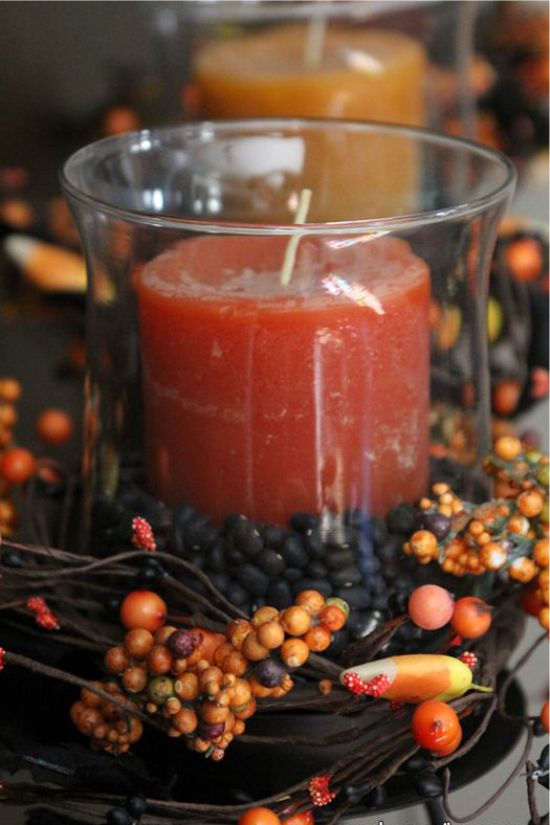
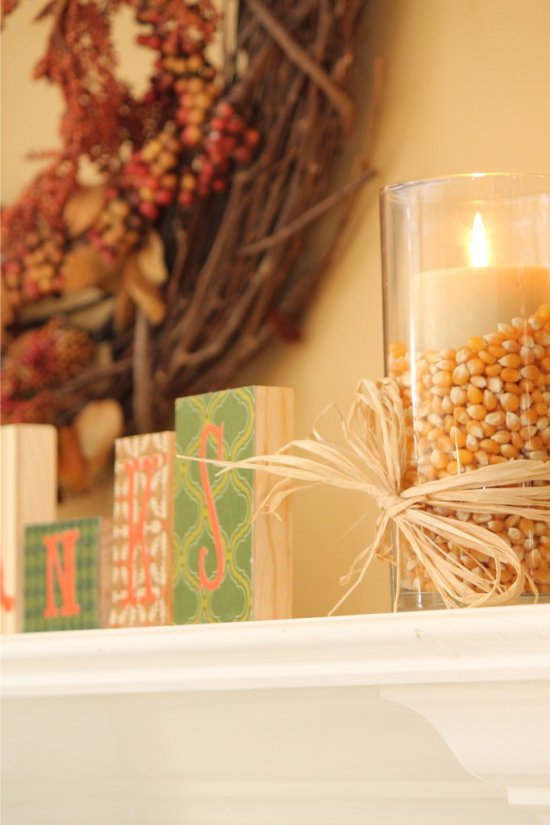
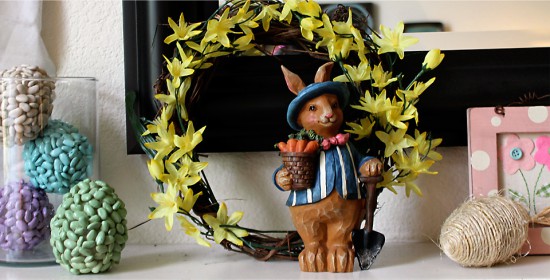
Candles with green peas in the spring table setting
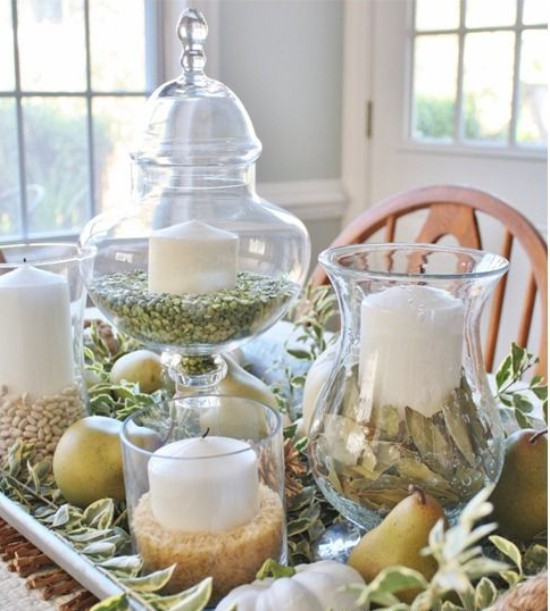
In this slider are presented photo-examples of decorative filling with groats of vases for flowers and plants.

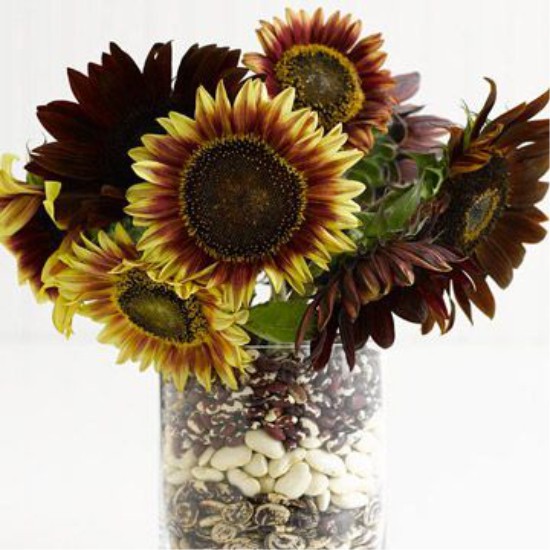
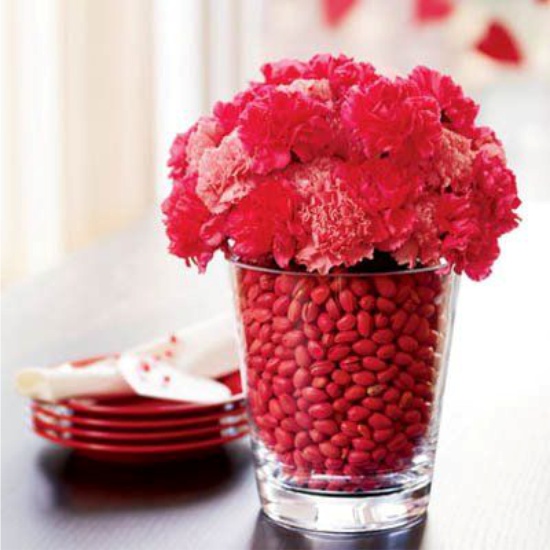
Groats and beans can be filled not only vases, but also bottles.
Here are examples of the practical application of vases filled with croup.
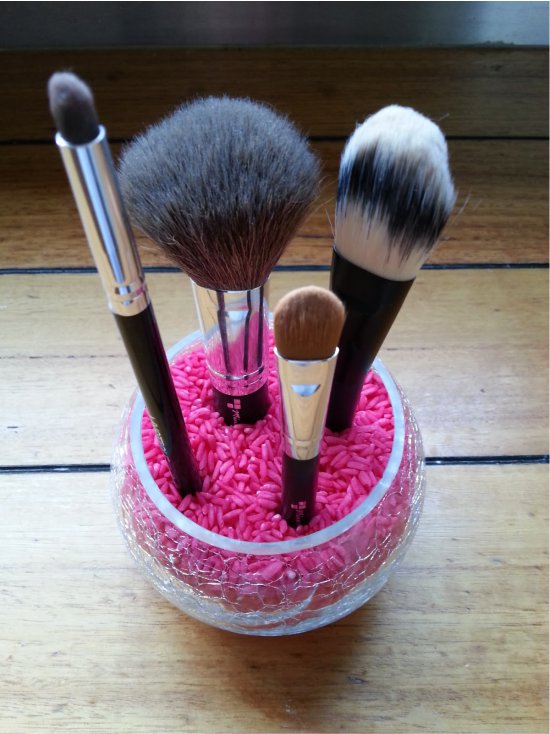
Glass for cosmetic brushes with colored rice filling
Here are some tips to help you create a beautiful composition:
- In order not to spend one kilogram of cereal on one candlestick, in the center of the container you need to put a glass that will support the candle.
- You can use one type of cereal or several types of cereals and beans of contrasting colors to make a striped filling of a vase.
- To pour colored cereals into the bottle in layers, use a funnel or just paper rolled into a cone.
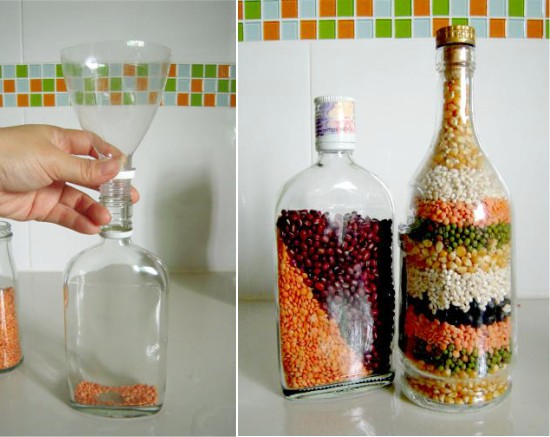
Filling bottles with cereal
- Colored beans can replace rice colored with food dyes as in the photo below (see the master class at the end of the article).
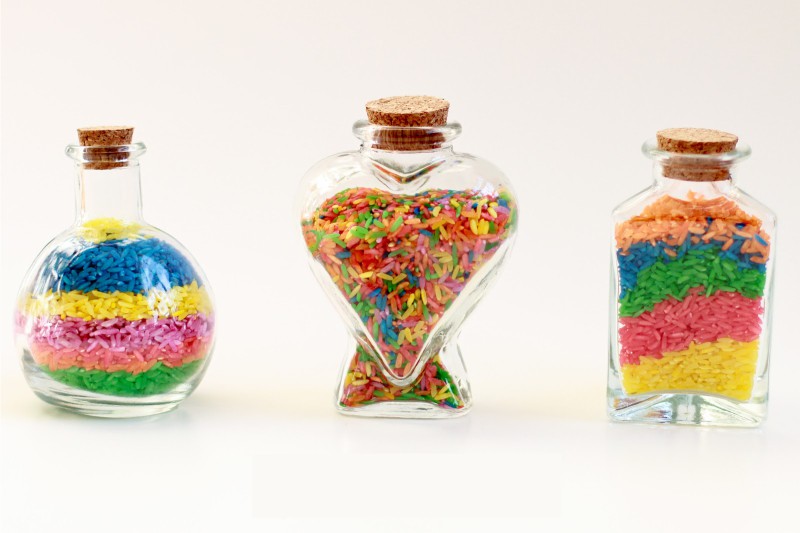
Decorative Bottles with Dyed Rice
See also: How to make a candlestick with your own hands: 70 photos, 7 ideas and workshops.
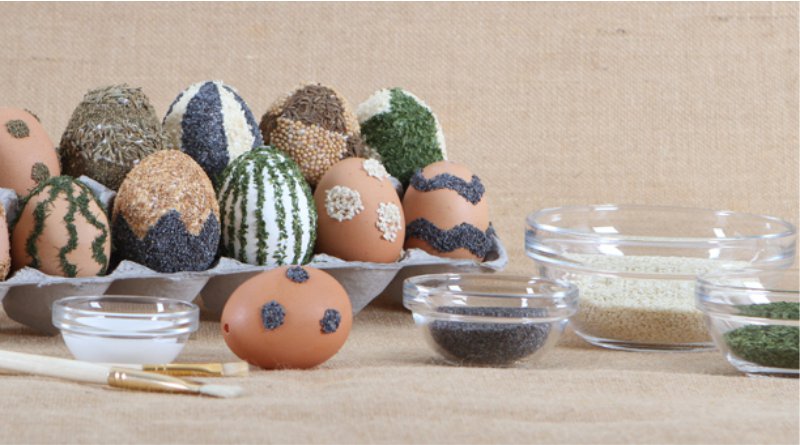
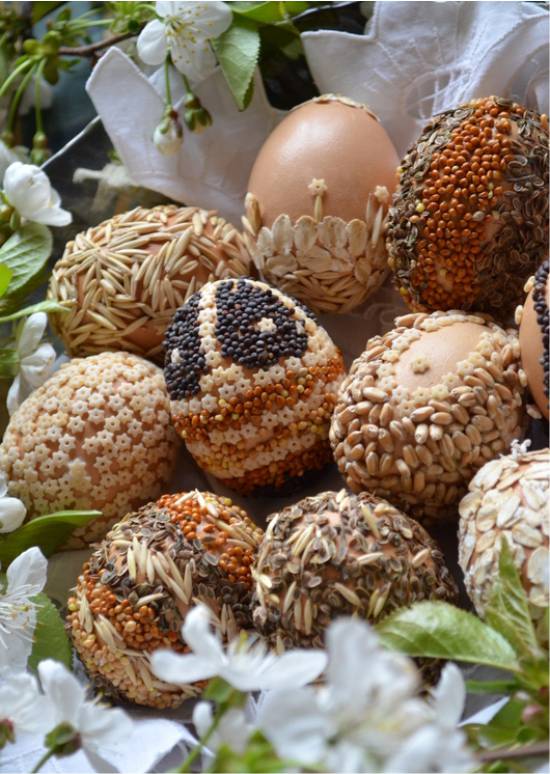
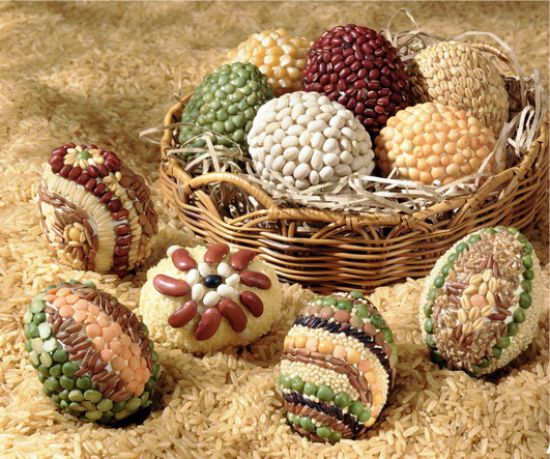
Idea 5. Easter eggs decoration
Fine cereals, grains, spices, star pasta, seeds, and dried herbs can be used to decorate Easter eggs. You can simply put the PVA glue on the egg and roll it in grains or create any patterns on the mosaic principle, after drawing on the shell a marking or sketch. For more accurate shapes and shapes, use stencils.
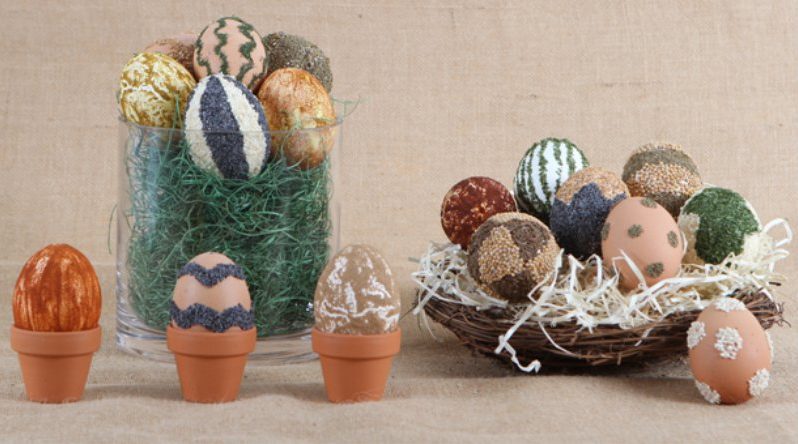 For decorating these Easter eggs were used: sesame, poppy seeds, dried basil, cumin, dill, parsley, salt and whole-grain mustard.
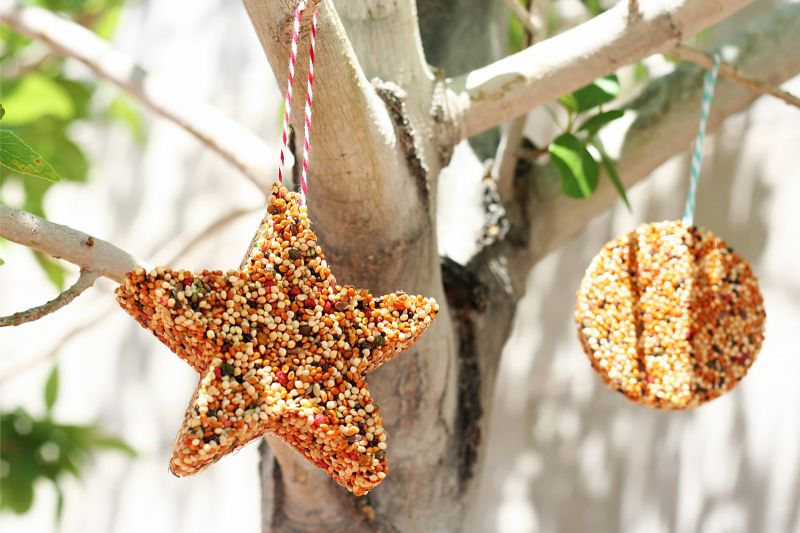
Idea 6. Figure bird food
Feeders in the form of cute figures - this is a more original alternative to birdhouses.
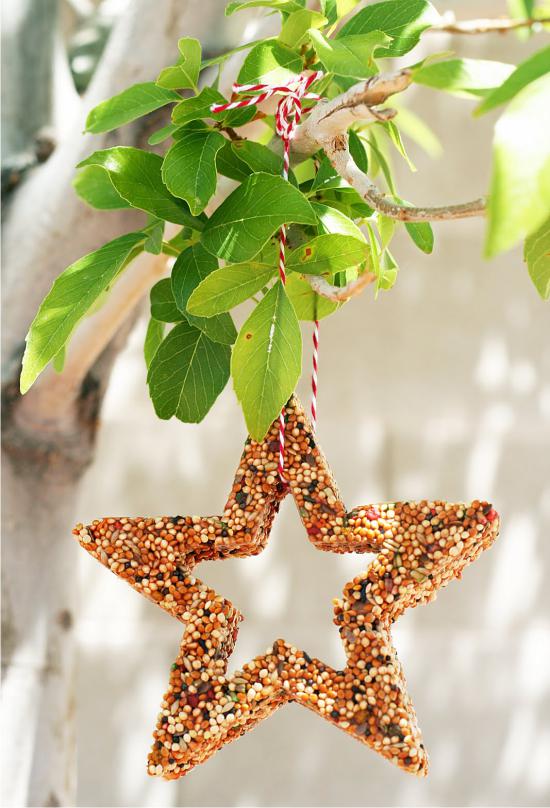
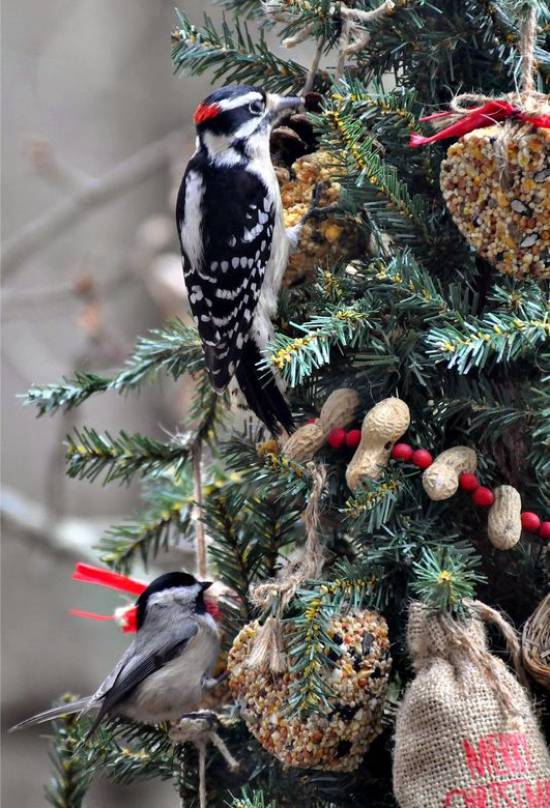
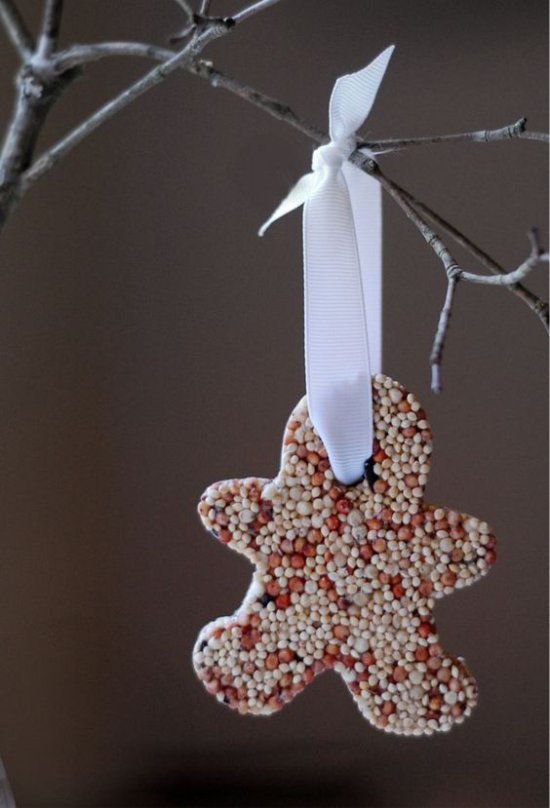
It is so easy to make such crafts from cereals and seeds that kids can cope almost without the help of adults.
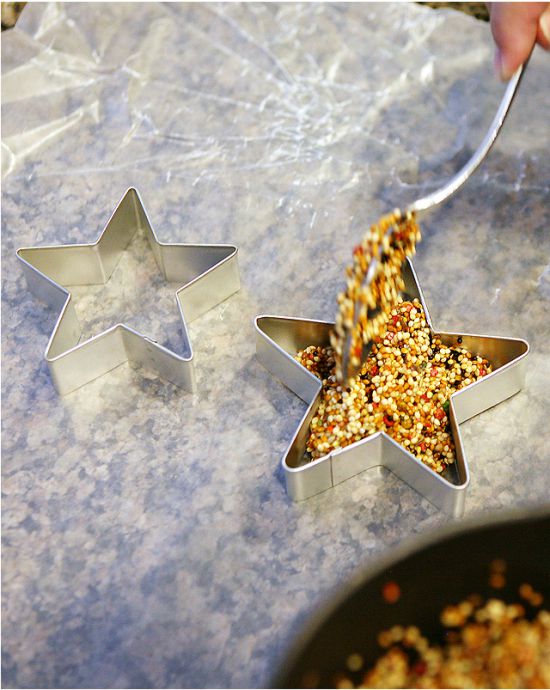
Materials:
- 3/4 cup bird food;
- 1 bag of gelatin;
- 1/4 cup water;
- Cookie cutters (large and medium size);
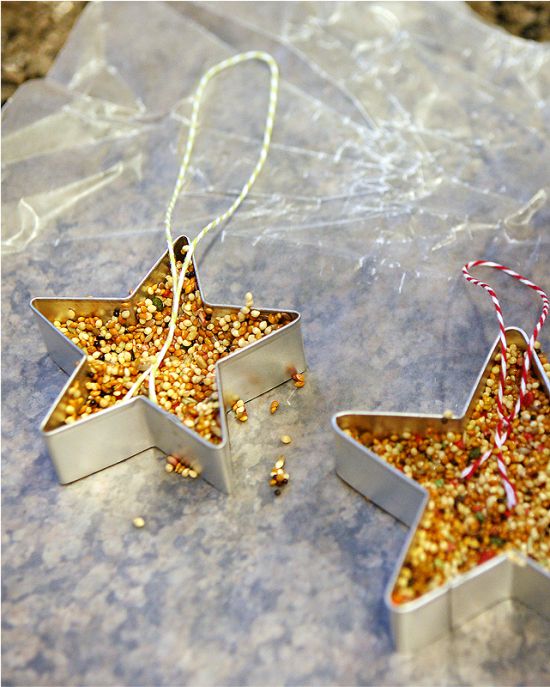
- Twine or ribbon;
- Straw;
- Baking paper;
- Large bowl;
- Pan;
- Spoon.
Master Class:
Step 1. In a saucepan, bring the water to a boil and add the gelatin. Hold the mixture on medium heat for about 5 minutes (until gelatin is completely dissolved), stirring constantly with a spoon.
Step 2. Remove the mixture from the heat and let it cool for about 1 minute. In a large bowl, mix gelatin and bird food (3/4 cup or a little more) with a spoon or with your hands. This work can just be entrusted to children.
Step 3. Put a piece of baking paper on the table and lay out the cookie cutters on it. Fill the molds with a mixture of bird food and gelatin half and tamp it down.
Step 4. Make loops of suitable length from the twine and slightly deepen their knots inside each mold with the mixture.
Step 5. Fill the molds to the top.
Step 6. Put all the figures in the freezer for 20 minutes, and then leave them to dry overnight or for a full day.
Step 7. Remove the molds from the molds, hang them in the trees and wait for the first guests!
Idea 7. Napkin rings
Decorate with mosaics of cereals and tubule seeds from toilet paper to create charming napkin rings that are ideal for autumn or country tableware.
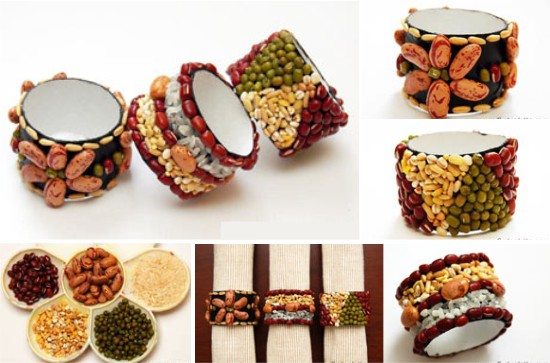
Materials:
- A variety of cereals, seeds, beans and spices;
- Tube of toilet paper;
- PVA glue;
- Stationery knife;
- Acrylic paints;
- Brush
Instruction:
Step 1. Cut the toilet paper tube into three sections of equal width (about 4 cm).
Step 2. Paint each section (inside and outside) in some neutral or contrasting color. You will get a blank ring.
Step 3. Prepare and sort the various seeds, grains, beans and spices.
Step 4. Apply a thick layer of glue to a small area of the ring and sprinkle or point to it with cereals and seeds. Wait until the glue in this area is dry and only then proceed to the processing of the next section. Continue these steps until the entire surface of the ring is framed, and then let it dry.
Step 5. If you are afraid that the seeds will peel off and crumble, additionally process them with a thick layer of glue, covering even the gaps between the seeds.
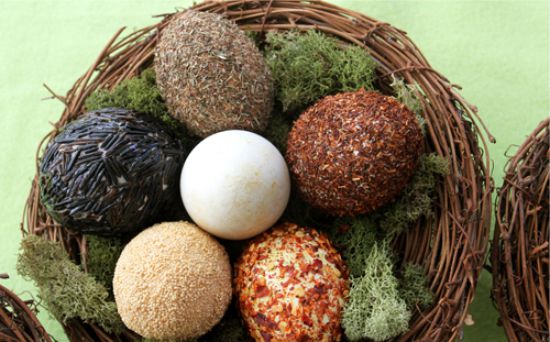
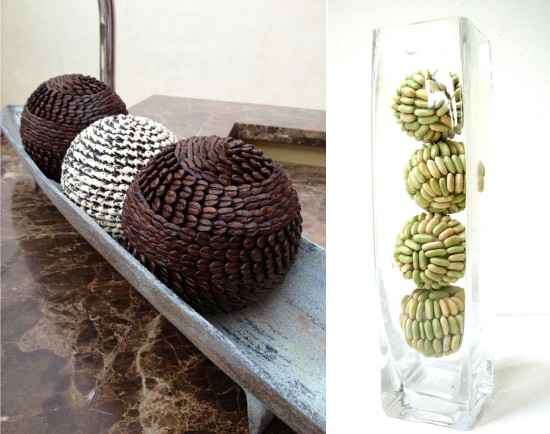
Idea 8. Decorative balls
From the grits and foam blanks, you can make decorative balls that will look spectacular on a platter or in a glass vase. Such a composition will decorate any dining table, console or coffee table.
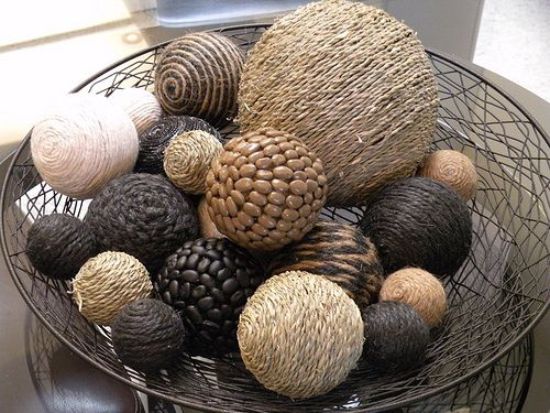
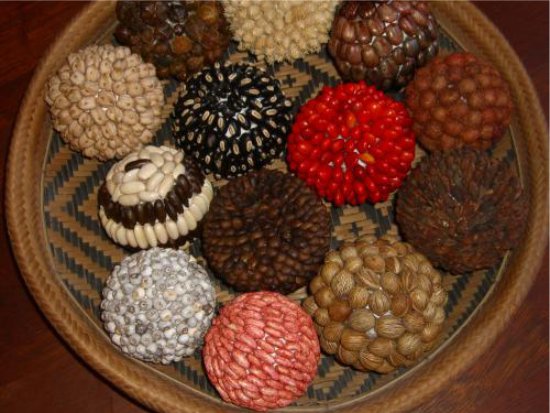
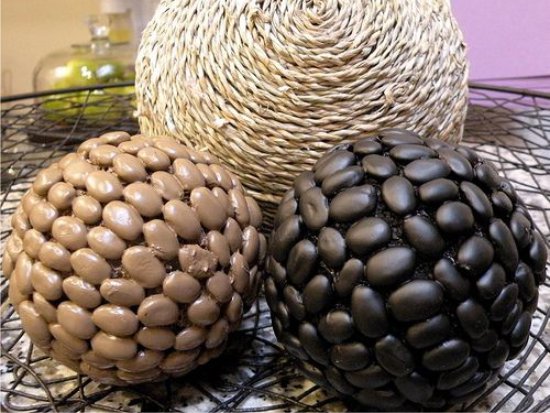
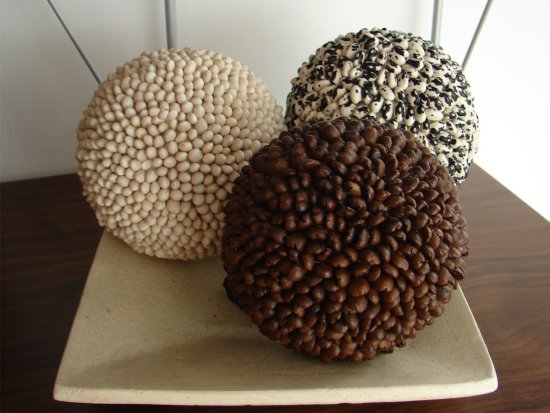
Materials:
- Black paint in spray;
- Foam balls of small diameter (or balls of floristic foam);
- PVA glue;
- Cereals, such as split peas, red beans, white beans, black beans and lentils.
Instruction:
- Paint the foam ball black or grits and let it dry.
- Apply glue to a small part of the ball with a brush, and then sprinkle the beans or glue them to the point. Let the treated area dry before proceeding to the next area. Continue this process until the entire ball is covered in beans.
- Make a few of these balls and lay them on a beautiful dish. If desired, complement the composition with candles, dried branches, cones or any other decor.

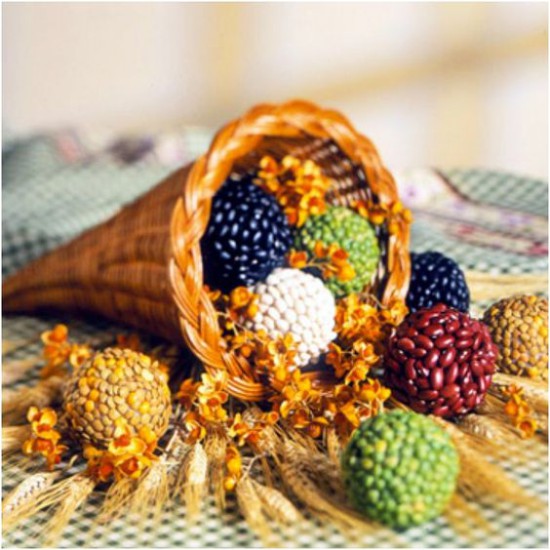
Composition of straw horn, balls of cereals and dried flowers
By the way, if you take foam eggs instead of balls and paint the cereal in pastel colors, then you will get original Easter decorations like in the photo below.
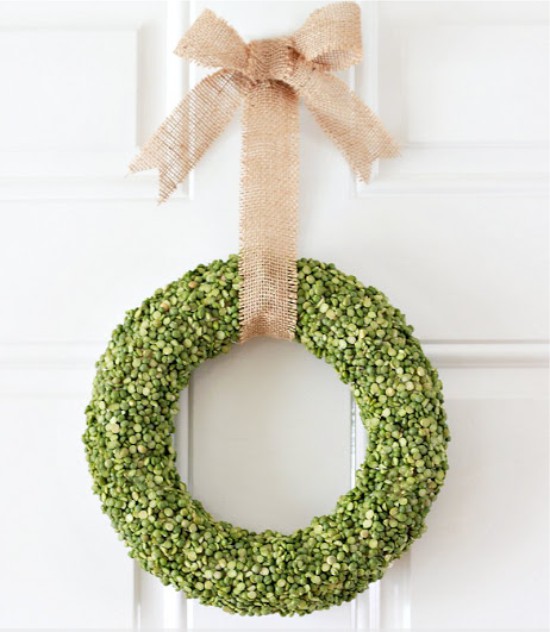
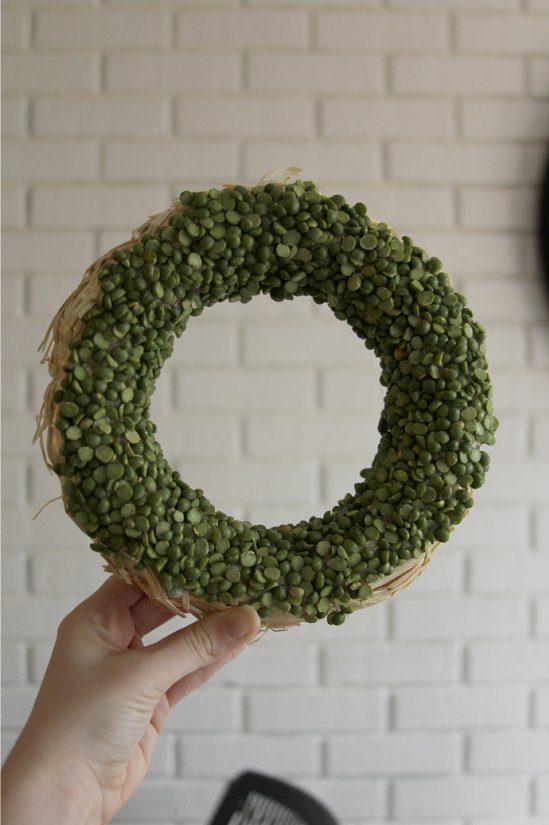
Idea 9. Decorative wreath
It is possible to make a beautiful wreath for cereal and seasonal decoration of the house from the grits and the base ring.
Materials:
- Chopped green peas;
- Two straw wreaths with a diameter of 20 cm (can be replaced with a foam stock);
- PVA glue or glue gun with a large supply of glue sticks;
- Brush;
- Baking tray;
- Foil;
- Twine.
Master Class:
- If you use a foam base, then first paint it to match the grain with acrylic paint and let it dry completely.
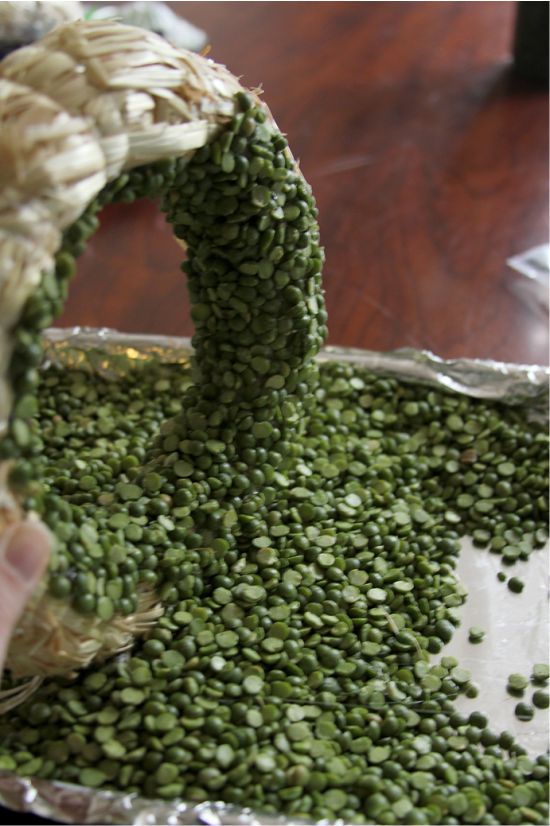
- Cover the baking sheet with foil and fill it with peas.
- Apply thermo-adhesive or PVA glue on a small area of the inner side of the wreath, then sprinkle cereal on it, brush away the excess and wait until the glue dries.
- Do the following in the same way. Continue until the entire inside of the wreath is covered with peas as shown in the photo below.
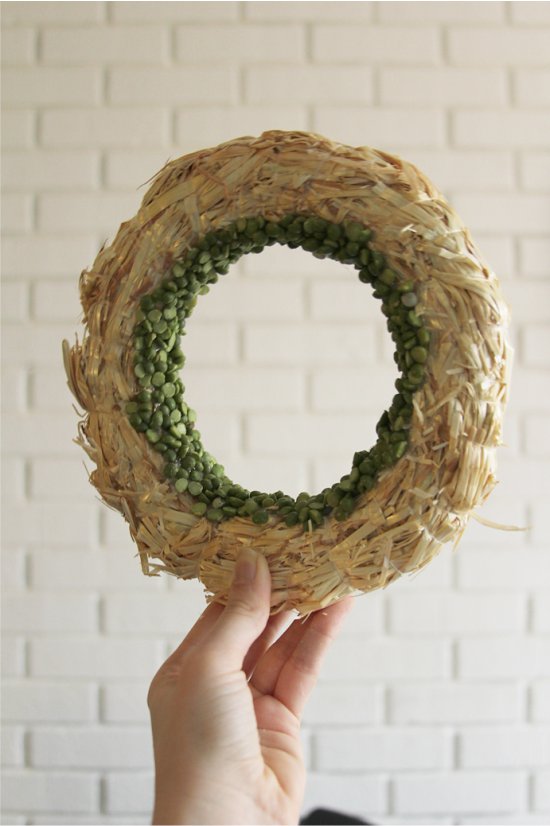 Registration of the inside of the wreath
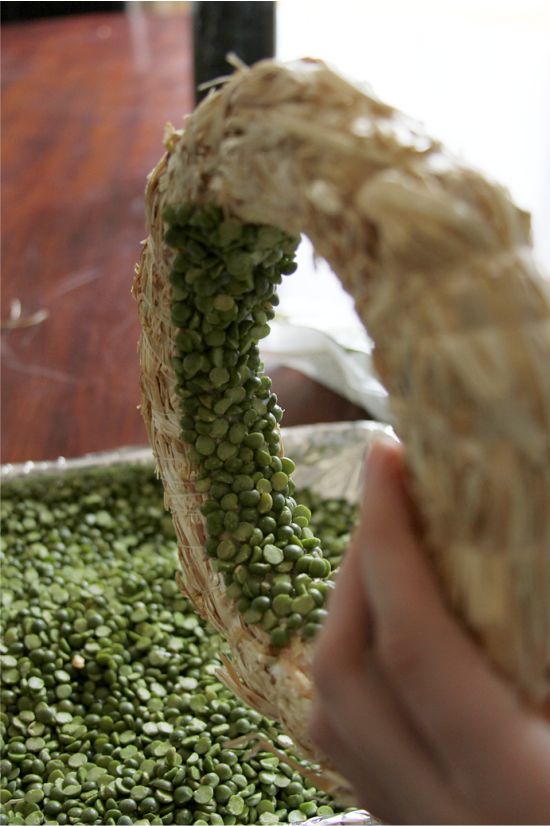
- Treat with glue a small portion of the outer side of the wreath, immediately roll it in a baking sheet with peas, slightly rotating. Wait until the glue dries out a little and proceed to the processing of the next section until the entire outer side of the wreath is covered with peas. Then work on the voids, filling them with dotted glue and grits.
 Making the outer part of the wreath with peas
- In the same way, decorate the back side of the wreath, and then its sidewall.
- When the whole wreath is covered with peas, and the glue is dried, additionally, use a brush with PVA glue on the grits, filling it with glue, including the gaps between the peas.
- Wait until the wreath is completely dry, then tie it with tape or twine, and finally hang it over the front door, window or dining table.
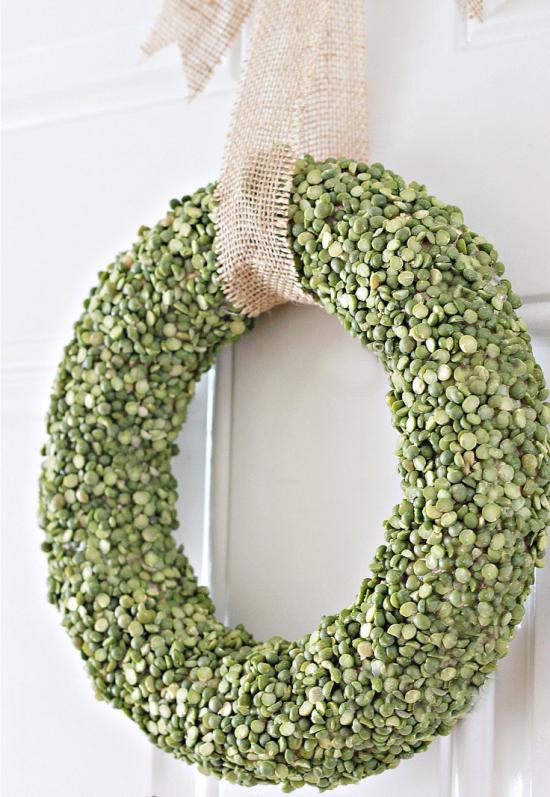
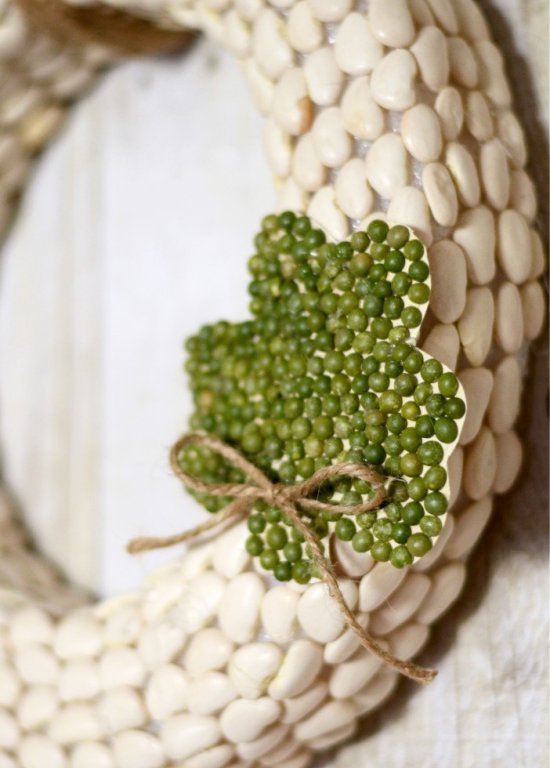
If you wish, you can decorate the wreath with dried flowers, sprigs, artificial flowers and berries or appliqué made from cereals of a contrasting color, for example, as shown in the photo below.
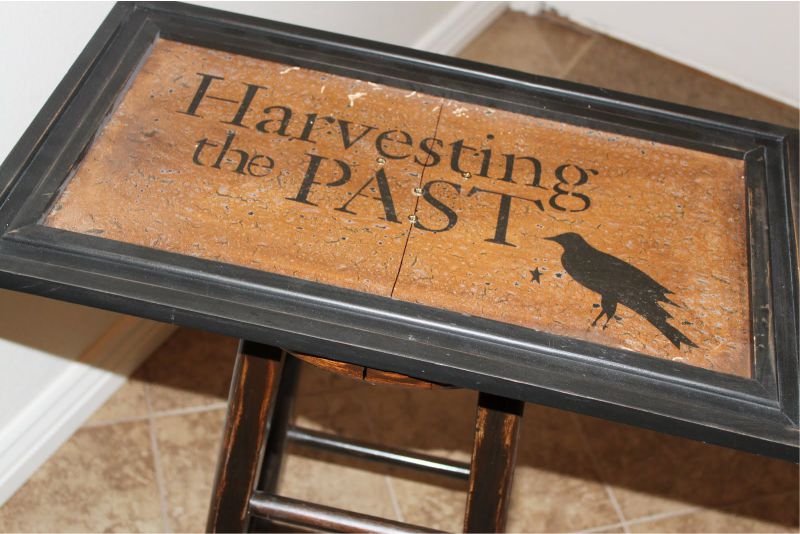
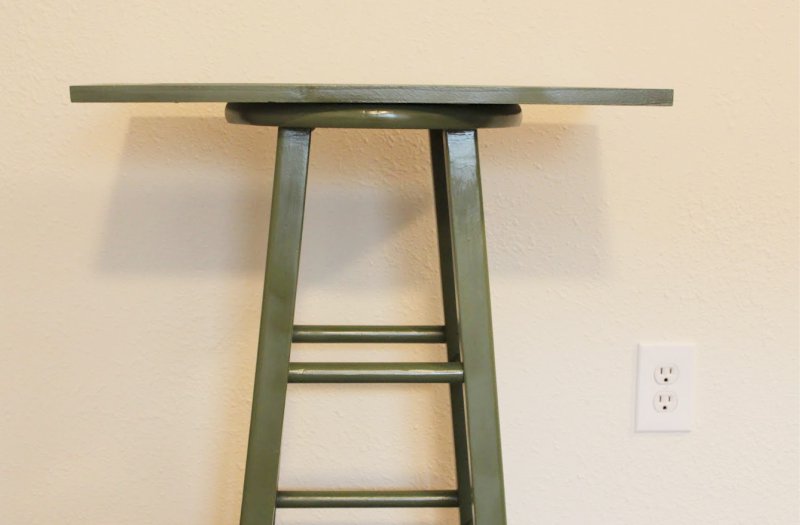
Idea 10. Coffee or serving table
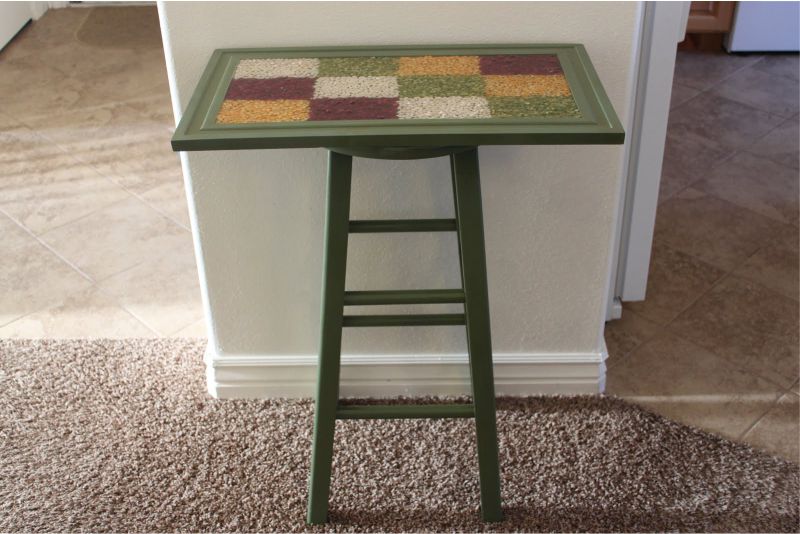
Materials:
- Large photo frame;
- Bar stool, the seat of which is slightly smaller in width than the frame;
- Drill and drill;
- 4 small screws;
- Primer;
- Paint;
- Paint brush and glue brush;
- PVA glue;
- Epoxy resin (in this case it took less than 1 liter);
- Cereals;
- Film to protect the floor.
Master Class:
Step 1. Separate the frame from the "native" back panel.
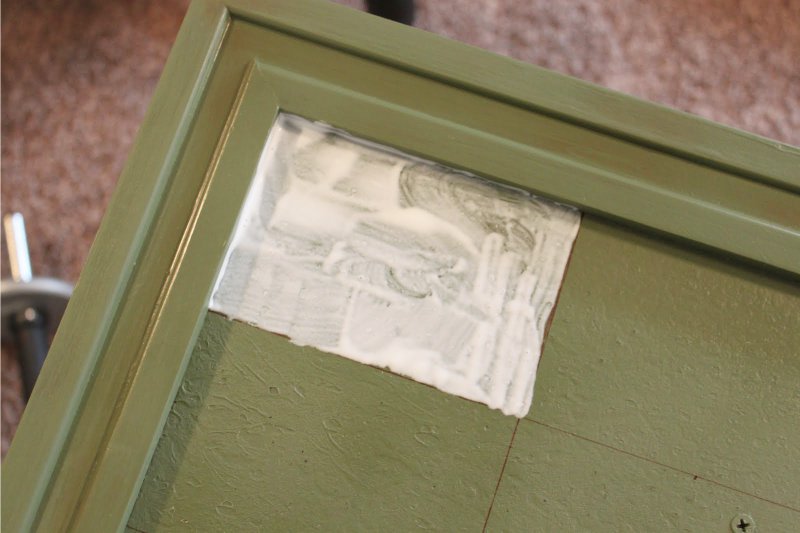
Step 2. Cut a panel the size of a frame from a thin piece of chipboard or plywood and glue it to the frame with liquid nails or wood glue.At this stage, it is advisable to seal the joints, for example, using putty on wood. This is necessary so that further epoxy does not leak through the holes between the frame and the panel.
Step 3. Put the frame on the stool and fasten it to the 4 screws with a drill (in the middle of the frame). You will have a design that resembles a table.
Fastening the table top to the stool
Step 4. Lay a film on the floor to protect the floor. Cover the table with a primer, wait until it is completely dry and paint it in 2-3 layers of paint. Keep in mind that each layer of paint should be allowed to dry before applying the next layer.
Paint the table
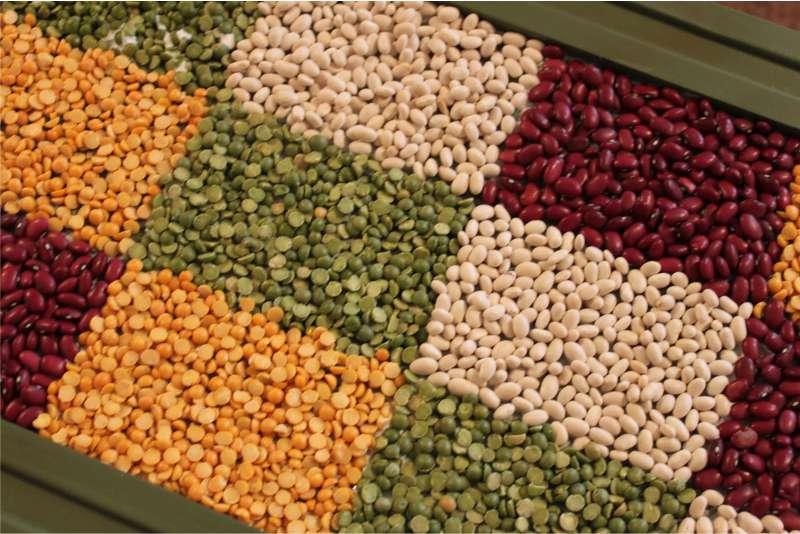
Step 5. Draw a few sections in the frame niche if you want to arrange a table just like in this master class, or draw a sketch of the drawing / layout according to your idea.
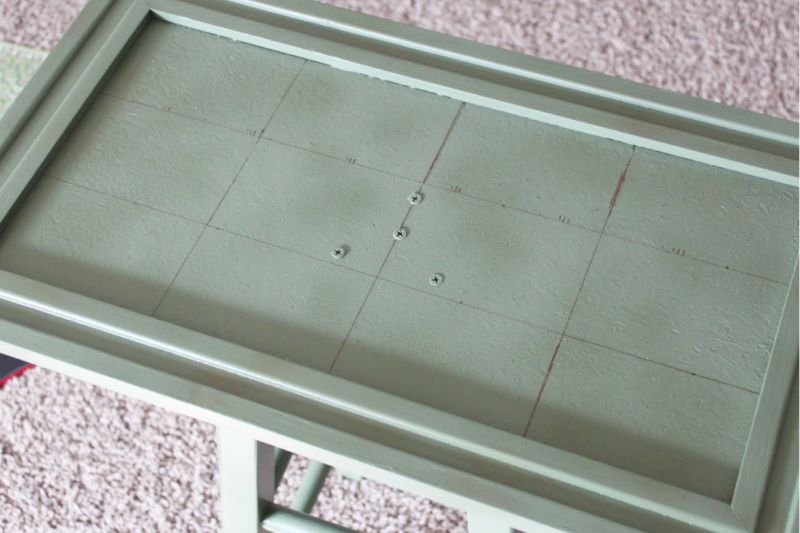
Marking on the tabletop
Step 6. Using a brush, apply a thick layer of PVA glue on the panel in a niche in a certain section and evenly place the cereal there. Ensure that the cereal layer does not protrude above the frame level. Continue to arrange the panel in croup in accordance with the markup.
Adhesive application
Decorating the tabletop beans
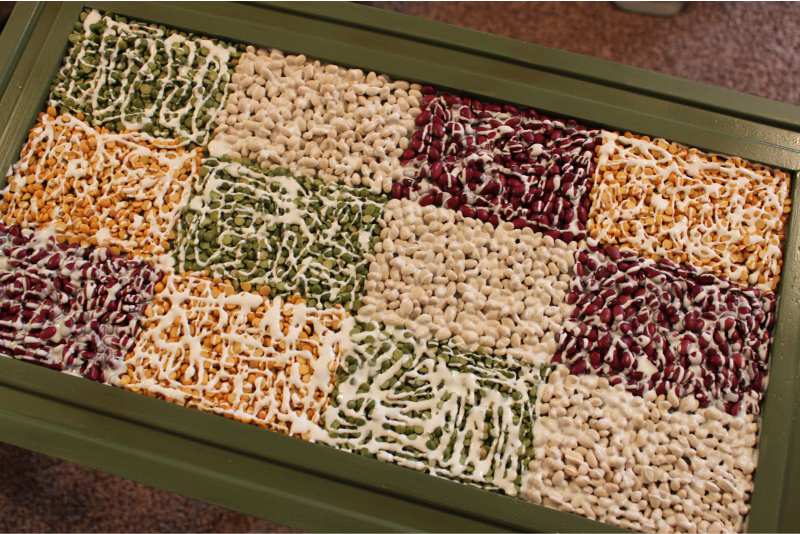
Step 7. If you want to exclude movements of the grains when pouring the resin, additionally cover the entire composition in the frame with a thick layer of PVA glue and let it dry for about 24 hours.
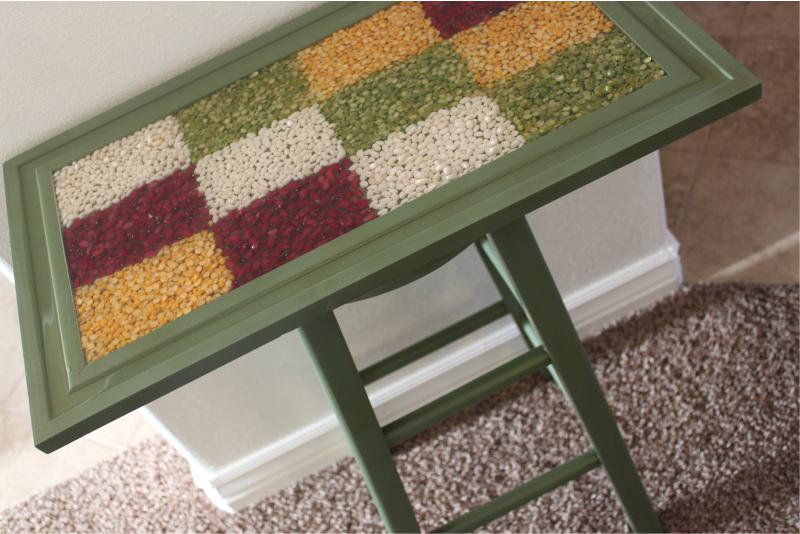
Step 8. Now it's time to pour the grits in the frame with pitch. Make sure the table is on a flat surface. Carefully following the manufacturer's instructions, mix the resin components, and then slowly pour the entire composition in one layer with it. Remove the formed bubbles by blowing them through the straw. Leave the table to dry overnight.
Step 9. When the first layer of resin dries, carefully pour the rump with the second layer, making sure that it does not go beyond the limits of the projections of the frame. Let the resin dry for another 24 hours and enjoy your new table.
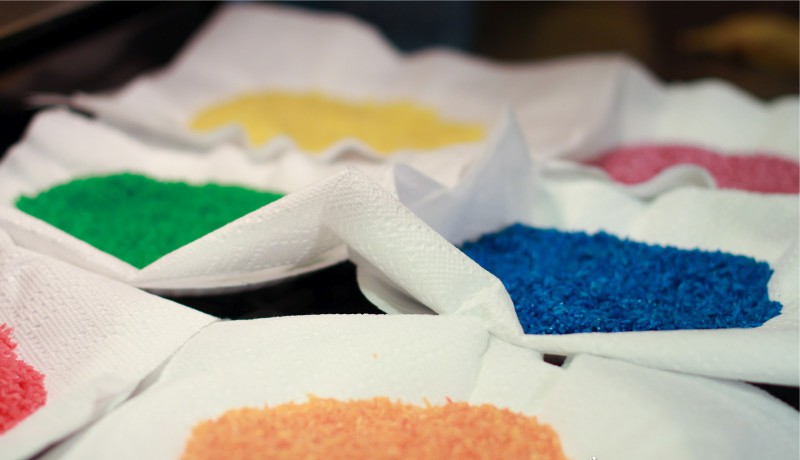
Master class: how to paint cereals and seeds with food dyes
Any light cereal like rice, white beans, or, say, pumpkin seeds can be colored with food dyes.
Materials:
- Zip-lok bags or simple plastic bags that will withstand a small shaking;
- Alcohol or vinegar;
- Liquid food colors;
- Krupa;
- Measuring cup;
- Baking tray or paper plates for drying colored cereals.
Instruction:
To paint one portion of cereal in one color you need to perform the following steps:
- Fill the bag with a couple of handfuls of cereals.
- Pour into it 1-2 tbsp. l alcohol or 3-4 tbsp. l vinegar.
- Add a couple of streams of food coloring.
- Close the package, remember several times and shake the package so that the paint covers all the grains.
- Put the painted cereal on plates covered with napkins, and let it dry.

 (Rate the material! Already voted:25 average rating: 4,80 from 5)
- Crafts from pasta - 15 ideas for adults and children
- Kitchen wall decor - 12 super ideas
- 8 seashell ideas for beginners
- 6 workshops and ideas of autumn crafts for adults and children
- Topiary made from cones, acorns and chestnuts - photo-ideas and 2 master classes
- Panels for the kitchen - ideas and instructions
Crafts made from seeds, cereals and other products that are eaten are blasphemy. Causes dislike for those people who live below the poverty line. This instills a low level of consciousness in children and adults.
With the exception of crafts Fruan, which are created for decoration, and in order to have them. There are enough other materials in the world from which you can create beautiful things, these are pebbles, dry twigs of leaves, crushed stone, bark, candy wrappers, old paper, shells ...
Then let alone the Internet, TV and delicious food for the people below the poverty line. If you cannot, stop writing condemning-depressive libels.
Thank you very much for the wonderful ideas! Took with the kids note! :))
Very nice, children develop motor skills, not expensive! Thank !