On the Internet and on Youtube you can find a lot of master classes on how to sew roman blinds yourself. But, as a rule, these methods require some sewing skills, the presence of a sewing machine and the preparation of various materials for their manufacture. But for those who can not sew, who do not have a sewing machine and who are not ready to pick up all the necessary devices, we have prepared a step-by-step master class on how to quickly and accurately make Roman curtains with your own hands practically without sewing.
- What is the essence of the usual ways? The first step is to sew curtains, then several slats are sewn to the canvas, 3 small rings are sewn to each rail, then ropes are passed from top to bottom, taken out through hooks and rings on the upper ledge, and finally, pulled them through a side hook. Thus, pulling the strings, the curtain can be raised and lowered. The fabric is attached to the eaves using velcro tape, and the eaves are made of wooden bar. This method has its pros and cons: you need to prepare slats, a bar, a bracket with self-tapping screws for installation, a furniture stapler, nylon ropes, etc.
- What is the essence of making Roman curtains with your hands without sewing and homemade cornice? Firstly, in this master class, we propose to process cuts of fabric with glue spider web, not sewing. This solution is suitable for curtains and will be no worse than the “line”. Secondly, we will replace the “kit” of a bar, rails, ropes, ringlets, etc. plastic blindswhich are inexpensive (150-500 rub.) and sold everywhere. So you do not have to look for lumber and various accessories, and this curtain will look very neat and beautiful.
What you need to prepare for work?
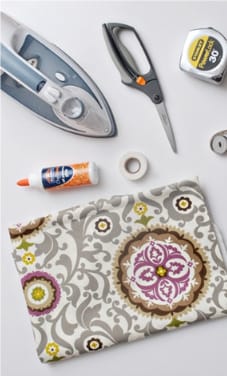
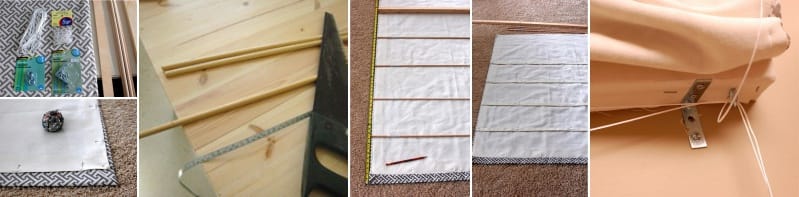
Before you begin, you need to buy and prepare:
- Cloth cut - the fabric must be tight so as not to sag and keep shape;
- Adhesive tape-web 0.5 mm-1 cm wide on a paper basis;
- Auxiliary materials: chalk, scissors, ruler, tape measure;
- A brush and a glue for fabric (sold at any sewing store, but you can also take the glue “Moment for shoes” or “Moment Crystal”);
- Any plastic blinds that fit the width of your window (old blinds will fit even with chipped and broken slats, as long as the lifting mechanism is in working condition);
- Iron and gauze as ironing.
Step 1. We make measurements and fabric cutting
To cut the fabric, you need to measure the window opening, but first you need to decide how you want to hang the curtains:
- Inside the window opening - in this case, the finished curtains should be 2 cm already window opening. That is, if, for example, its width is 150 cm, then we need ready-made curtains of 148 cm. To the desired width, add 6 cm to the folds along the edges and get the width of the cut of the fabric 154 cm.The length of the cut is calculated as follows: we subtract 2 cm from the height of the window opening and add 3 cm to this number (to the bottom hem) and the height of the eaves (usually 4 or 2 cm).
- Above the window opening - in this case, measurements of the window should be done the same way as for ordinary curtains, but we measure the fabric for cutting according to the following principle:
- The width of the cut fabric = the desired width of the finished curtains + allowance for bends at the edges of 6 cm;
- The length of the cut fabric = the desired length of the finished curtains in loose form + 3 cm allowance for the bottom hem + eaves height (you need to measure, usually 2 or 4 cm) + a couple of centimeters so that you can wrap the eaves, and there was no ugly cut of fabric it is seen;
According to the received measurements, we cut the fabric and then iron it.

Step 2. We process the side edges
Now we need to process the side sections of the tissue.
1 way: just once we turn the edges to a width of 3 cm, weaving the web (we can take it without a base) between the two layers of fabric as shown in the photo and fix it with an iron. If there is a sewing machine, then slices can be pre-decorated with an overlock. We repeat this procedure for the other sidewall and bottom of the curtains, and the top is not touched yet.

- Ironing the cobweb should be well-heated iron with steam and preferably through a cotton cloth or gauze. The main thing here is not to overdo the iron, but not to rush, so that the glue has time to melt and grab with the fabric, then the curtains will last for a long time and will not require sticking after several washes;
- Previously, it is better to exercise and test the web on an unnecessary piece of cloth.
2 waywhich is a bit more complicated than the first one, but then the edges will look neater, since the crumbling cuts will be hidden in a secret hem:
- We put the fabric inside out, make indentation from the edges of 3 cm and mark the small dotted line along the entire length of the canvas with a ruler;
- Now turn the fabric face up and put it on the ironing board. Then we apply a glue spider to the very edge (paper-based top) and begin to iron it right on the base, lingering at each section for 10 seconds. Attention! You do not need to peel the paper yet.;
- Finished? Now we turn the fabric inside out and bend the same edge with the cobweb up, and then it turns out that the paper base "looks at you." Again we iron it to the end and for the time being we do not peel it off;
- Now, once again, we bend the edge still inside out, but already indented by 2 cm, that is, right up to the line of our marking. The fold of the fabric is again simply ironed, without removing the paper layer from the web;
- And now, when the hem is formed and ironed, we can safely tear off the paper and glue it completely.
- Repeat the procedure with the other side of the fabric and with the bottom, but do not touch the top yet.
Step 3. Glue the top of the fabric to the eaves
Next on the front end of the eaves we smear glue for the fabric and glue it to the upper edge of our curtains (on the wrong side), while slightly wrapping the raw cut over the eaves, as shown in the photo.

- Before you glue, read the instructions of the glue manufacturer - sometimes the fabric is smooth enough, and sometimes you need to put a heavy press for a while at the gluing site;
- Before using the glue, be sure to test it on an unnecessary piece of material.
Step 4. We redesign the blinds
As long as we leave the fabric alone and begin reworking the blinds, this is done simply and quickly, so even a child can handle it. Our task - to shorten the blinds to the desired length, and most importantly - to remove excess slats and leave only a few pieces. To do this, we cut the rope that binds the slats to each other as shown in the photo below; It is important not to confuse it with a regulating cord.
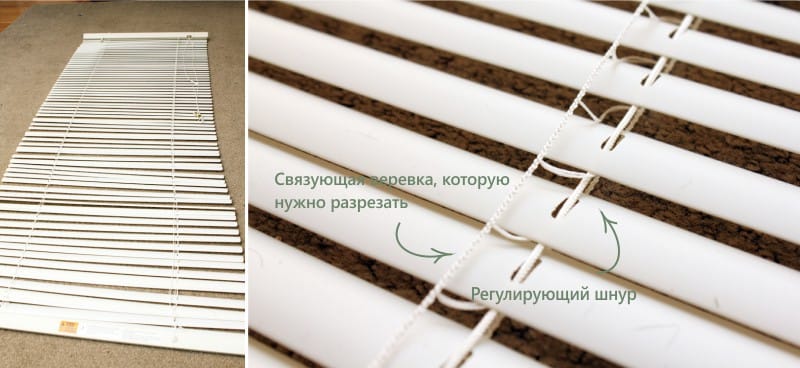
Done! Now we take out the cut rope and get the blinds with the slats freely moving along the cords, as can be seen in the next photo.
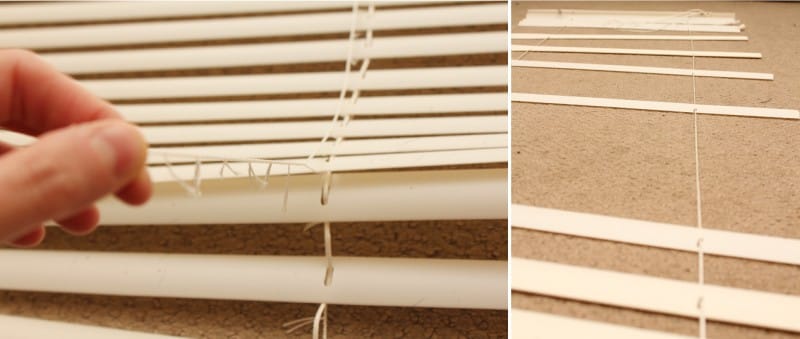
Next, we determine how many lamellae should be left, and then remove all unnecessary as superfluous.
- For short curtains (up to 145 cm) on small windows you need 6 folds. In this case, you need to leave 5 lamellae (without taking into account the lower weighting bar);
- For standard curtains (145-225 cm) you need 7 folds. In this case, leave 6 lamellae (without taking into account the lower weighting bar);
- For long curtains (over 225 cm) you need 8 folds. In this case, you should leave 7 lamellae (without taking into account the lower weighting bar).
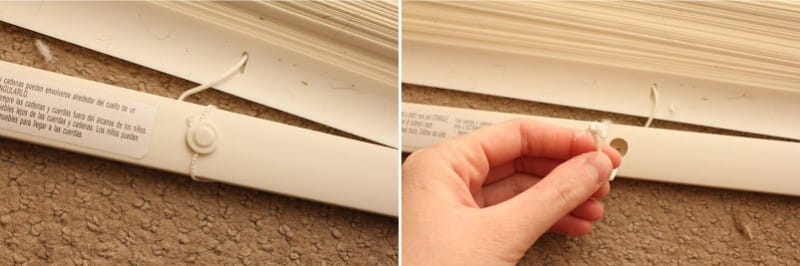
In order to pull out the extra slats, we unfasten the plastic cap on the lower weighting bar and untie / cut off the bundle of cords as shown in the photo.
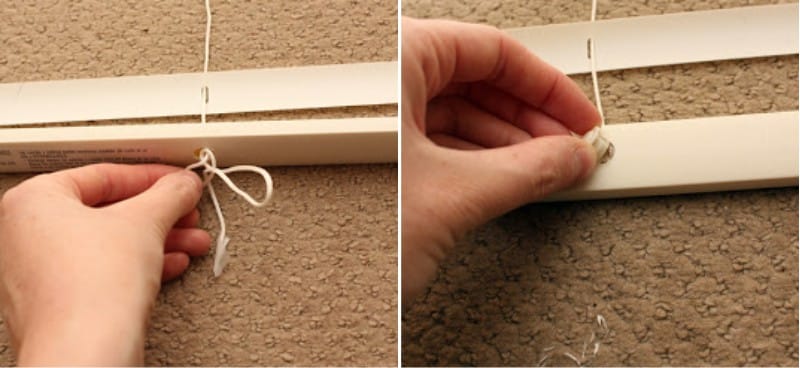
Then we remove all the extra slats, leaving only 5, 6 or 7 pieces and, focusing on the length of the curtains, cut off the excess cords, if any. Now we put a weighting bar back on these cords, tie the knots and fasten the plugs.
Step 5. Glue the slats to the bar
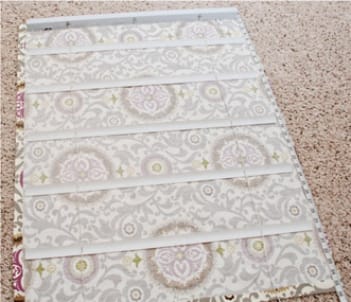
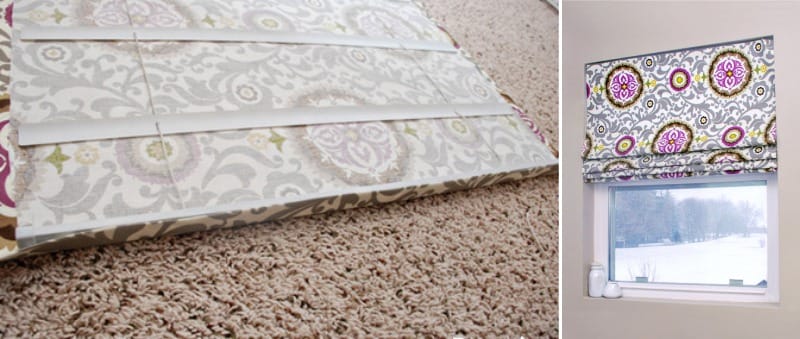
Hurray, we have done most of the work. Next you need to carefully distribute the slats on the canvas with the same interval as shown in the photo on the right.
- To make it more accurate, you can calculate the spacing value using the formula: spacing between slats = (length of finished curtains / number of slats) - (minus) the height of each slat (usually 1, 27 cm or 89 mm).
We make the markings shallow, that is, we note where we will glue the lamellas, then apply glue on them and press them to the fabric (according to the manufacturer's instructions). It is important to glue the lamellae without hitting the adjustment cords.

Step 6. We process a bottom
Almost done! It remains only to glue the bottom edge of the curtains to the weighting bar, as shown in the photo, and install the eaves. This can be done with the help of our master class or manufacturer's instructions.
Links to interesting videos
We are glad to share useful links to video lessons from a professional seamstress:
- For those who want to sew roman blinds with their own hands, we can make the eaves and the lifting mechanism out of scrap materials by ourselves, we offer this clear and visual master class for viewing.
- And here is the following video with a master class on how to sew roman curtains with your own hands, if you have a special factory cornice:

 (Rate the material! Already voted:33 average rating: 4,42 from 5)
- Guide to choosing Roman curtains for the kitchen window
- Curtains for the kitchen: color, material, look and style
- Curtains-threads in the kitchen - the choice, care, making their own hands
- Kitchen curtains on the grommet - modern fittings for modern curtains
- Curtains-arch for the kitchen - a master class on sewing and tips on choosing a design
Complete nonsense!! such a curtain is not washable, but it will crawl. although the glue itself can move away from the smooth plastic lamella and hello. complete nonsense. it is better to spend a little more time and effort and already stitched a good Roman curtain. and not waste time in a couple of months to change it again ..
that's for sure! bullshit