
If you bought or ordered vertical or horizontal blinds, then we suggest you install them yourself, because you can cope with this task without even having experience, the main thing is to have a desire, 1 hour of free time and several tools.
Attention! Installing blinds does not require special skills, but keep in mind that any breakdowns that occurred in the process of independent work, will exclude the possibility of warranty repair, exchange / return of curtains.
Depending on the type of curtains, your preferences and conditions, blinds install:
- In the window opening;
- On the wall;
- To the ceiling;
- On the window itself.
We have compiled 3 step-by-step instructions and a selection of helpful videos with which you can install horizontal and vertical blinds of any kind in any way.
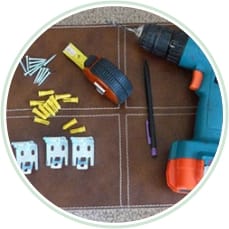
To install horizontal blinds on the wall or to the ceiling, as well as to install vertical blinds above the window, you need to prepare:
- Electric drill with a drill for concrete 6-8 mm;
- Screws and dowels 6-8 mm;
- Roulette or ruler and level;
- Pencil;
- Phillips screwdriver or screwdriver;
- If necessary, shortening and cutting the curtains in width: a hacksaw, scissors, thread, needles.
Installation instructions for horizontal blinds on the wall / to the ceiling

To properly install the blinds to the wall or ceiling you need to perform the following steps.
Step 1. We check the curtains and lay out all the details on the working surface.
Make sure that the kit includes: universal fasteners for blinds 2 pcs. (or standard brackets), screws, shutters themselves assembled. In case you install blinds more than 2 m wide, then an intermediate fixture should be attached to the set of fasteners, which will fix the curtain in the middle, not allowing it to sag.
Step 2. We attach the curtains to the wall / ceiling, determine the exact place of their installation and mark the left and right edges of the curtain rod using a tape measure and level. Next from each mark (in the direction to the side from the center) we make an indent of 2-3 cm and also put marks - these are the places for installation of fasteners-brackets.
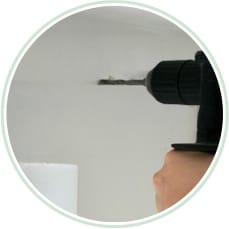
Step 3. Now we attach right and left fasteners to these marks and mark the exact drilling points right along the holes for the screws. Drill drill these tags. Drilling depth should be 3-4 cm.
Step 4. Next, the brackets are fastened to the wall or ceiling with screws. The figure below shows how to do it correctly.
Step 5. If you are installing blinds more than 2 m wide, then at this stage you need to install intermediate fasteners. To do this, mark the middle between the already installed fasteners and repeat the steps from steps 3 and 4.
Tip: for reliable installation of heavy aluminum, bamboo and wooden curtains, intermediate fasteners are also installed 10 cm away from the regulating thread, since this place has a large load.
Step 6. Insert and close the upper curtain rail blinds in the brackets locks. If it is standard brackets, then the eaves are simply fastened to them with screws.
Instructions for installing horizontal blinds in the window opening

To install horizontal blinds in the window opening, the following work must be done.
Step 1. We check the equipment and lay out all the parts on the working surface.
Make sure that the louver includes: fasteners for louvers (brackets) 2 pcs., Screws, the louver itself assembled.
Step 2. We try on the curtains to the desired place in the window niche and check if the blinds do not interfere with the opening.
Step 3. Now we apply the right and left fasteners to the upper inner plane of the window niche, departing from its walls by 2-3 cm in the direction of the center, then make notes in the places of the fasteners' holes. Thus, you get 2 marks on the right and 2 marks on the left.
Step 4. Now on these marks with a drill we drill holes. Drilling depth should be 3-4 cm.
Step 5. The right and left fasteners (in accordance with the sides and marks) are fastened to the upper plane of the window opening with self-tapping screws.
Step 6. We insert and close the upper curtain rail blinds in the bracket locks, simply by turning and / or pressing the lever clockwise. If you use conventional brackets for mounting, the curtain rail blinds are simply screwed.
Instructions on how to install blinds directly on the plastic windows with your own hands, see this video:
And how to properly shorten horizontal plastic or wooden blinds with your own hands can be found here:
Installation instructions for vertical blinds to the ceiling / wall and window opening

Do-it-yourself installation of vertical blinds involves the following steps:
Step 1. We check the equipment and lay out all the parts on the working surface.
The set of vertical blinds includes: fasteners for blinds (brackets) 2 pcs., Screws, curtain rod, the curtains themselves in unassembled form (slats with weights, lower connecting chain).
Step 2. Before you install the blinds, you need to make sure that their length suits you. To do this, attach one lamella to the desired location on the ceiling / wall / top plane of the window opening. If the distance from the bottom of the curtains to the window sill or the floor is less than 1-2 cm, then the slats are better to shorten. You can do it yourself: get weights, cut off the excess and hem the edges back.
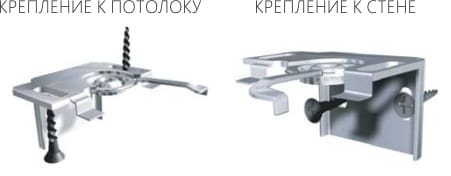
Step 3. Now you need to attach the cornice to the ceiling / wall of the window opening, align and mark its right and left ends.
Then do the following:
- If you install vertical blinds to the ceiling, then from the previously set marks we indent 2 -3 cm towards the center and put the marks again;
- If you want to install blinds to the wall, then from the previously set marks we indent 5-6 cm towards the center and also set the marks.
If you mount the curtains in the window opening, then the ends of the eaves are not necessary to mark, just make notes, stepping back from the walls of the opening 2-3 cm in the direction of the center.
Then we attach fasteners for blinds to these marks and mark the places of drilling. Thus, you get 2 marks on the right and 2 marks on the left. Do not forget to attach the fasteners to the corresponding sides.
Note: for installation of curtains with a width of more than 1.6 m, it is necessary to additionally install an intermediate mount 10 cm from the regulating cord.
Step 4. Now on these marks with a drill we drill holes. Drilling depth should be 4-5 cm.
Step 5. The right and left fasteners (in accordance with the sides and marks) are fastened with screws to the ceiling / wall.
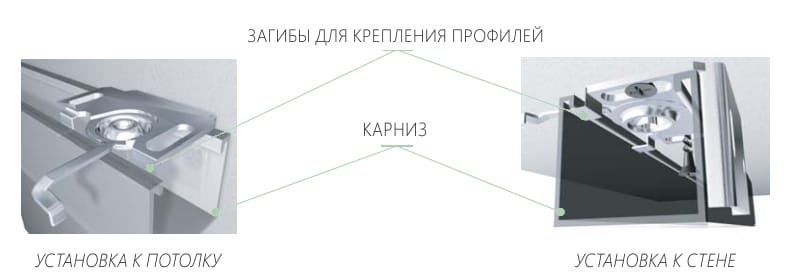
Step 6. We insert and close the eaves of the blinds in the fastener locks by turning and / or pressing the lever clockwise. If for mounting you use ordinary brackets, then the eaves are simply screwed to them.
Step 7. Adjusting the cord, turn the sliders so that they are turned across the eaves (as shown below on the left photo) and proceed to fixing the slats, simply locking them in the slots of the sliders.

Step 8. We fasten the lower chain to the weighting lamellas first from their outer side, then we cut off the excess and do the same on the reverse side of the lamellae, and then with the second part of the lamellae. Well, that's all, the installation of vertical blinds is complete, it remains only to check the operation of the mechanism and adjust the position of the slats.
Below is a video tutorial on how to properly install vertical blinds with your hands to the wall.

 (Rate the material! Already voted:10 average rating: 4,70 from 5)
- Blinds in the kitchen - a step by step guide of choice and 45 photos
- Making blinds for 1 evening: 3 master classes for creative and resourceful
- Curtains for the kitchen: color, material, look and style
- Kitchen curtains on the grommet - modern fittings for modern curtains
- Curtains-arch for the kitchen - a master class on sewing and tips on choosing a design