Suspended ceiling in the kitchen of plasterboard will be the best solution for facing the ceiling of the kitchen due to the excellent qualities of the material - environmental friendliness, moisture and fire resistance, lightness and flexibility.
Pros and cons of plasterboard ceiling in the kitchen
Plasterboard ceilings in the kitchen have great potential and many advantages:
- They can hide or disguise communications - wiring and pipes;
- Defects and irregularities of the ceiling will also not be visible;
- This is a great way to divide kitchen space into zones - working and dining, especially true for ceiling zoning combined kitchen-living room and studio apartments;

- You can come up with any ceiling design that can become an accent in the interior of your kitchen;
- When installing plasterboard sheets, you can additionally warm and soundproof the room;
- You can re-think the lighting of the kitchen - create niches for lighting, install Spotlights in the work area, and above the dining table hang a chandelier, as is now fashionable;

- Gypsum plasterboards are strong enough, so the ceiling construction will not crack due to the movement of the ceiling or walls.
The drawbacks of the plasterboard ceiling:
- Unfortunately, at least 7 cm of height will inevitably be lost, which means for kitchen with low ceilingsThis type of finish will not work;
- In addition, the DIY installation of a suspended gypsum ceiling (especially a two-level and with a complex design) requires some skills, as well as time, the availability of tools, help from a partner and effort;
- Over time, the ceiling can be deformed, cracked in the joints.
We think over the design
To choose the right design, on the basis of which two-level gypsum ceilings will be created, it is necessary to evaluate the following criteria:
- The configuration of the room and its dimensions;
- The ways of finishing admissible in the general interior decision;
- Color and texture;
- Used lighting devices;
- Applied decorative additions.
There are also requirements and recommendations that should be considered:
- In the kitchen space is always used hood with a hob. The duct required for this device is best hidden under the ceiling, falling in this part.
- You can lower the entire perimeter of the ceiling, leaving the central part at the same level. This option is suitable for those who appreciate symmetry - elements with a decrease in height can be used for spotlights. Such lighting fixtures easily zoning kitchen space.
- To create a positive effect, the backlight in the kitchen can be supplemented neon ribbons.
- As for color, then for suspended structures it is better to choose pastel, muted shades. And the use of glossy textures will help to make the room visually more spacious.

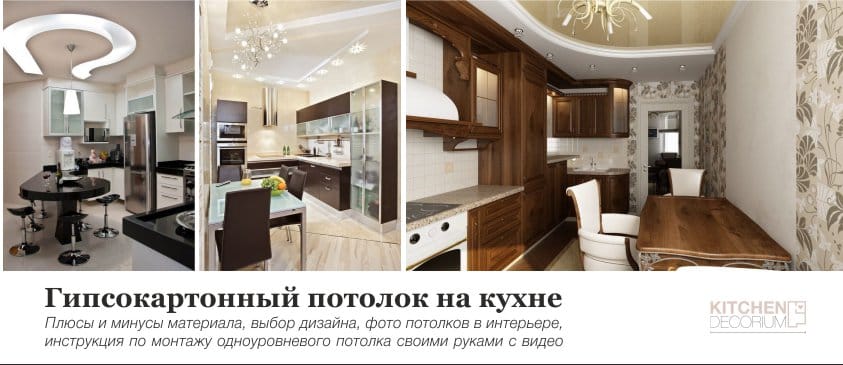
The suspended plasterboard ceiling in the kitchen can be done in various ways. This may be a single-level flat design, no different from the usual ceiling. Such traditional design will fit into any interior.


Surface with protrusions and niches can delimit the space and hide the communication.


Hinged ceilings in the kitchen, if the height of the room allows, often have a structure of several tiers. Most often perform the ceiling of two levels - the ceiling-base and convex geometric shapes around the perimeter of the room or in the center.


Very relevant abstract corner elements, as well as ovals, semicircles and other shapes. Such a complex design is more like a spacious kitchen with high ceilings.


However, in a small or medium-sized kitchen, it is also possible to distinguish the dining area with plasterboard ceiling figures.


However, one should not forget that any suspended structure will “take” several precious centimeters in the height of the room; therefore, for miniature and low kitchens, complex ceiling design is not recommended - it is better to choose a single-level ceiling.

If desired, you can create a combination of stretch and plasterboard ceiling.

How to choose materials: GK-sheets, putty and paint
- Ceiling sheets of drywall are lighter than wall sheets, and most often have a thickness of 8.5 - 9.5 mm.
- In order for the ceilings from drywall in the kitchen to delight you as long as possible, you need to choose a moisture-resistant material. If you use the usual GK-list, the design will very quickly become unusable, because the kitchen has a high level of humidity. And moisture-resistant drywall is not deformed either by the ingress of water or by sudden temperature changes.
- In order to keep the ceilings in the kitchen to retain their impeccability for a long time, it is recommended to carefully choose putty and finishing materials. They must also be moisture resistant and have a long service life. Poor quality putty can be cracked with a spider web. As for the paint, it should be suitable for areas with high humidity, easy to apply on horizontal surfaces and to be resistant to UV light.
And how to calculate the consumption of materials - the number of sheets, suspensions, profiles, guides and crabs?
Draw a plan of your ceiling by hand (in compliance with the scale) or in the program and place on it sheets of ledgers, guides around the kitchen perimeter, and supporting profiles - across, then mark where the crabs and suspensions will be located.

Making a one-level ceiling yourself
To sheathe the ceiling with plasterboard sheets with your own hands, you first need to prepare all the necessary tools and materials.

The actual process of installing ceilings includes 4 main stages:
- Creation of a frame from special profiles;
- Fixing drywall sheets;
- Plaster and painting (decorating) the surface;
- Installation of the lamp and lighting.
If you are planning to install the kitchen ceiling yourself, then invite at least one assistant. After all, drywall sheets are heavy enough to lift them alone.
To make a false ceiling in the kitchen with their own hands, perform the following sequence of actions:
- Find the lowest point of the surface and mark the walls. This will require a marker thread and water level.
- The UD-profile is fastened to the marked bands, after which the structure is embroidered across the entire plane with the CD profile. Elements are fixed with special mounting strips and dowel-nails.
The distance between fasteners should be 500-600 mm.
- Plasterboard sheets are attached to the created frame. For this, screws are screwed in with a 200 mm pitch, not more. If you need to cut the drywall during installation, use a special cutter or knife for this.

- Fully sheathed by the GK ceiling is stacked - first all seams are sealed up to ensure the tightness of the structure.

- The seams are glued over with a serpyanka and once again puttied, after which they pass the entire surface.
- After the putty has dried, the surface is decorated - painted or pasted over with wallpaper.
 (Rate the material! Already voted:5 average rating: 5,00 from 5)
- Ceiling in the kitchen - 7 ways to design
- Rack ceiling in the kitchen - features of choice and installation
- Plastic panels on the ceiling of the kitchen - profitable and practical
- Stretch ceilings in the kitchen - design, care, myths and reality
- How to repair the ceiling in the kitchen with their own hands