When deciding how to trim the ceiling in the kitchen, you can give preference to the following materials:
- Plastic panels;
- Suspended ceiling plasterboard;
- Stretch ceiling;
- Polystyrene plates;
- Rack ceiling;
- Painting and whitewashing.
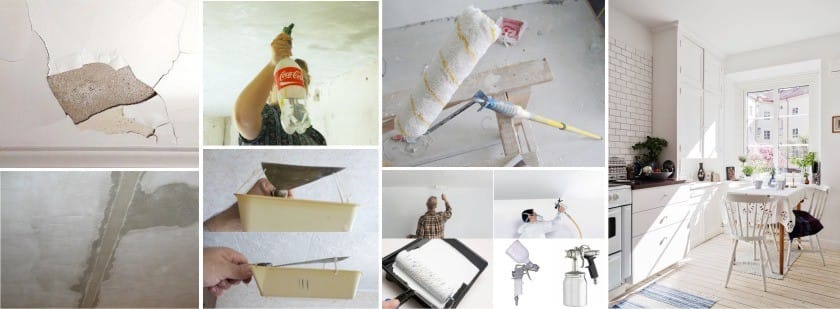
In this article we will look at the process of removing the old coatings, which is almost always required when repairing and installing any kind of ceiling. And then we will dwell on the topic of basic, serious repair and figure out how to make it with your own hands - properly level the ceiling, close up cracks and rusts, make a high-quality primer, plaster and putty, and then paint / whitewash the kitchen.
Remove the old finish
Any repair of the ceiling with your hands begins with the total removal of all old coatings. What do we need at this stage?
- Ladder;
- Covering film and masking tape to secure it;
- Respirator, goggles and gloves - there will be a lot of dirt;
- Spray conventional or garden with a pump, if not, take the usual roller with a long nap (preferably with a long handle), a sponge, a ditch or a bucket of water;
- A spatula (preferably, such as in the picture, especially for removing old paint), also a chisel with a hammer and a metal brush for removing a layer of paint can be useful for beating plaster;

- For quick mechanical cleaning (observing safety), you can use a hammer drill or grinder.
The old coating is completely removed - paint, whitewash, peeling plaster.
Whitewashing can be removed in two ways - wet (the chalk coating can be simply washed) and dry. As a rule, these two methods are applied as follows: first, a small area is moistened (not the entire area at once, as the wetted surface dries quickly) with water, wait 10-15 minutes until the water is absorbed into the old coating, and then begin to actively remove it with a spatula, in difficult places it is better to use a punch. In the joints of the slabs (rust) also need to remove all unnecessary.


If mold spots are found under the plaster, the ceiling should be treated with a special anti-fungal primer or any chlorine-containing compound (for example, Belize, if the mold is small and not old). Of course, all work should also be carried out in a respirator.

More details about all the nuances of work on the removal of paint, whitewash and plaster can be viewed in the following video:
We ground, we plaster, we shpatlyuy, we level, we close up cracks and rusta
Prepare everything you need for work, namely:

To paint the kitchen ceiling correctly means to adhere to the following sequence of actions:
- Before you paint the ceiling, it, as we said above, must be primed. This will further strengthen the base and improve adhesion. Do not neglect this stage, the unprimed ceiling will start cracking very soon.

To make it go faster, use the spray gun, not a roller.
It is better to choose a primer of deep penetration and, of course, with an antiseptic. After all, we do repairs in a special room - in the kitchen.
- After the primer is dry, you can proceed to the plaster and putty. But first you need to determine how smooth the ceiling, whether you need plaster or you can immediately begin to putty.
- Plaster is not needed if the ceiling drops are insignificant from 10 to 15 mm.
- Overfalls of more than 15 mm require preliminary plaster, which is leveled with beacons.


- And if the ceiling has drops from 20 to 30 mm, rust and cracks, how to make the ceiling in the kitchen smooth? Rusty (or large cracks) is cleaned, widened to 30-50 mm or more, primed, after the primer has dried, wipe and fill the hollow with foam and give it 24 hours to dry, then cut off the excess foam and reapply it. When the primer dries, put plaster on the joint tightly with a spatula, then apply a whole tape of reinforcing serpyanka and plaster it.

- Changes in the ceiling-base of 3-5 cm require more serious measures - the use of metal reinforcing mesh, fixed to the concrete with ceiling dowels and withstanding a large layering of cement-sand mixture plaster (Rotband). After the plaster dries, you can begin to putty.
It is better not to do such a difficult and responsible repair of the kitchen ceiling with your own hands, but to entrust it to the master.

- And what to do if the irregularities exceed 5 cm? In this case, it is better to install a suspended ceiling - plasterboard, batten, plastic or tension. Aligning such curvature is difficult, long, expensive, and most importantly - unsafe.
- After that use the finishing plaster putty, which must be applied with a wide spatula in 1-2 layers, while the first layer should, of course, dry. The last layer should be thin - about 1 mm.

- 6 hours after the putty, the surface can be wiped and sanded, it can be done manually, and better and faster - with a grinder. Then it should be re-primed - diluted with paint or penetrating primer. Give dry and proceed to staining. We are looking into the details of the ceiling filling with our own hands in this tutorial video:
Paint the ceiling
- It is possible to paint a ceiling only when the primed surface dries. Start painting preferably from the window. In addition, if you paint the surface with a roller with a short pile, you get a smooth coating. A rough texture can be created by using a long pile roller. One strip of paint should go a little on the other.


- It is desirable to paint the surface in two layers, and the first must dry before applying the second. One coat of paint must be applied at a time - otherwise there will be a visible joint between the areas.
How to choose the coloring composition for the kitchen ceiling
Repairing the ceiling with your own hands by painting or whitewashing is the most common (largely due to its budget) method.
Before you paint the ceiling, you need to choose the right dye. The traditional method of painting involves the use of lime or chalk solution.

This material was used a hundred years ago, but so far among its merits are the following:
- Cheapness;
- Environmentally friendly (lime absorbs harmful substances);
- Ability to mask small surface defects.
A layer of whitewash needs to be periodically updated, but if you paint without washing off the previous layer, then very soon non-aesthetic “nodules” will form on the surface. In addition, in this case, you can forget about design delights.
Paint the kitchen ceiling better still water-based paint. Compared with lime, it forms a thinner and more attractive layer.

Compositions of this type almost do not smell during the work, differ in cost-effectiveness, availability and variability of shades.To create a durable and reliable coating, you can paint the water emulsion in several layers - this will not prevent the passage of air, which means that the room will not be stuffy. Among the most tangible disadvantages of this type of paint is the impossibility of washing. Ceilings can be wiped with a dry cloth or slightly damp, but without friction.
The best material for painting the kitchen ceiling, experts call acrylic paint. The resulting surface can be washed not only with water, but also with soapy solutions - the only exception is abrasive-containing substances.
The surface obtained with the help of such a dye is distinguished by aesthetics and decorative effect.
Paint the surface in the kitchen is better matte, not glossy dye. Gloss is able to emphasize the unevenness of the base, and the matte layer, on the contrary, will hide them.


 (Rate the material! Already voted:10 average rating: 4,80 from 5)
- Ceiling in the kitchen - 7 ways to design
- Rack ceiling in the kitchen - features of choice and installation
- Plastic panels on the ceiling of the kitchen - profitable and practical
- Plasterboard ceilings in the kitchen - from design to installation
- Stretch ceilings in the kitchen - design, care, myths and reality
Came to this site by chance. Questions that interested me were found and what is interesting - everything. Usually we had to look for the missing information, and here everything is from A to Z. We finish the repair of the ceiling in the kitchen, it turns out beautifully. Very pleased with the step by step description of all the works.