Rack ceilings for the kitchen consist, in fact, of aluminum slats with curved edges. The standard lengths of the rails are 300 and 400 mm, and the width is 90, 100, 150, 200 mm. The thickness of the material also differs - the strength of the resulting structure directly depends on it.

Not only can the dimensions of the battens differ, but also their design and the type of special protective coating. Reiki can be not only the color of the metal, but also any other, since they are covered with several layers of varnish and other coatings.

In addition, thanks to the flexibility of the rails, you can even make a "curving" ceiling.

Rack classification
Choosing material for the kitchen ceiling, you need to know the types of designs:
- Open type of slatted ceilings: connected with a small gap, suitable for those rooms where the ceiling height is more than 5 meters;

- The closed type of slatted ceilings: butt-butted, according to the principle of wooden lining;

- The ceiling with the addition of decorative inserts: like the open type, but the gaps are closed with aluminum strips, so you can combine colors and "play with the light."


The ceiling with inserts is considered the most convenient to use, but here you need to be careful in choosing a design - it is not recommended to combine more than 3 colors.
The closed type of slatted ceilings in white, or veneered, will harmoniously fit into almost any interior. This ceiling is really very similar to the ceiling of wooden wall paneling, which is a more traditional and expensive type of ceiling decoration.

Rack ceiling in the kitchen - the pros and cons
Rack ceiling, like all other types of ceilings, has its pros and cons. But how suitable is it for the kitchen?
Pros:
- Rack ceilings have excellent moisture resistance, due to which the ceiling will not lose its attractiveness even in conditions of high humidity, therefore it is often used in bathrooms;
- Rack ceiling in the kitchen is very easy to clean;
- When installing between the base and the slats, there is a gap that can be used for laying communications, so you can rethink the lighting and install Spotlights or hang a lamp over the dining table, as it is becoming fashionable now;
- It also eliminates the need to carefully level the base;
- Design variability allows you to choose slats that fit any kitchen interior;
- Durability, stability under mechanical loads, as the slats are made of metal - aluminum or steel;
- The material has antistatic properties and does not accumulate dust on the surface, that in the conditions of the place where the food is prepared, it is very important;
- Rack ceiling more accessible than a stretch.
Minuses:
- Among the weighty flaws it is necessary to note only the reduction in the height of the room, because the lath ceiling has a suspended structure (from 4 to 15 cm). therefore for kitchen with low ceilings such a ceiling is not desirable;
- In addition, the assembled ceiling does not provide for partial dismantling for local repair.
How to choose the right material
Rack ceiling is purchased with traverses and hangers.

Before ordering, calculate the amount of material, for which measure the area of the room and add to the resulting dimensions of 2-3 cm in stock.
Tip! If your kitchen is of irregular shape, then another tire must be included in the kit.
And for you to get really high-quality panels, you need to focus on the following recommendations:
- High quality slats are realized exclusively in a protective film, which allows to prevent damage during transportation;
- A set of lighting fixtures should be purchased immediately with the ceiling;
- Reiki with increased thickness will ensure the integrity and durability of the structure.
Not less important is the design of the rails, because their color palette is quite wide. The following are considered popular:
- White ceiling slats with enamelled matt finish;
- "Mirror" with chrome finish perfectly fit into the interior type modern and high tech;
- Reiki can be painted in gold, bronze and copper;
- Laminated with natural wood veneer - suitable not only for classic style kitchens or country-style, but for any other.

How to install a slatted ceiling in the kitchen with your own hands
First, prepare the necessary materials and tools:
- Himself kit rack ceiling with traverses and hangers;
- Drill;
- Laser level and tape measure;
- Dowels and screws;
- Scissors for metal;
- Knife, pliers, screwdriver;
- Ladder.
Work on the installation of slatted ceilings in the kitchen is not particularly different from their installation in the bathroom, only in the bathroom walls can already be tiled, which somewhat complicates their drilling. And in the kitchen it is made even easier, and even a novice can easily make an installation with their own hands.
So, the sequence of works is as follows:
- The installation height is determined and the ceiling is marked using a laser level. An installation line is applied around the entire perimeter.

- Next, fasten the end profile along the applied line. For express mounting, a perforator is used to make holes every 40 cm, and then liners from plastic dowels are driven into them. After this, the profile is fixed in the prepared places with self-tapping screws.

- When the end profiles are fixed, mount the crossheads, which are pre-cut to the desired length. First, in the profiles themselves, and then in suspensions.


- In size, intermediate profiles and slats are cut with metal shears, which are fixed in the grooves of the end profile and the fixings of the traverses.

- Similarly, the next element is installed, and an intermediate profile is placed between them, if there is one.
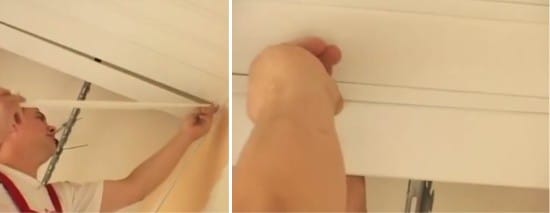
- The sequence of actions is carried out before the installation of the last river.
- Set the last bar, which, if necessary, can be cut along.
- And now you can install the lamp in a pre-prepared hole, and your rack ceiling for the kitchen is ready.

 (Rate the material! Already voted:5 average rating: 4,40 from 5)
You can find out more about all the nuances of editing by hand in the following video:
- Ceiling in the kitchen - 7 ways to design
- Plastic panels on the ceiling of the kitchen - profitable and practical
- Plasterboard ceilings in the kitchen - from design to installation
- Stretch ceilings in the kitchen - design, care, myths and reality
- How to repair the ceiling in the kitchen with their own hands
Thank you, your article really helped. I have a boiler in the kitchen with an open stove. those. in the winter you can cook on it. The ceilings are not very high, so any kind of wallpaper and cardboard are not suitable. We decided to make a slatted ceiling. From the variety of colors chose matte silver. By cleaning such a ceiling is very convenient and simple, I wipe it with a damp cloth, thanks to the matte texture, there are no stains.And it was quite simple to mount it, we did it together, there is nothing heavy.
Julia, thank you) Come again!
Rack ceiling looks good, in combination with the ceiling of GVL, it is desirable to perform in several levels.