Pasting the kitchen with wallpaper is not a very complicated process that you can handle yourself. It is only necessary to choose the right material, prepare the necessary tools and surfaces, comply with the technology of cutting and gluing cloths. Renovating the walls is a great way to quickly and relatively cheaply change the interior of the kitchen.
Briefly about the kinds - which is better?
First you need to decide on the appropriate material for the conditions of the kitchen and the desired design.
What to choose in terms of practicality? There are the following types of coatings:
- Paper;
- Flizelinovye;
- Vinyl;
- Textile;
- Liquid;
- Fiberglass wallpaper.
Each of these materials may look beautiful, but, of course, they have different strength and moisture resistance.
On each roll you will find a label on which you can determine how the wallpaper is suitable for the kitchen. As you can see, some icons are underlined - it is desirable that your wallpaper have exactly such characteristics.
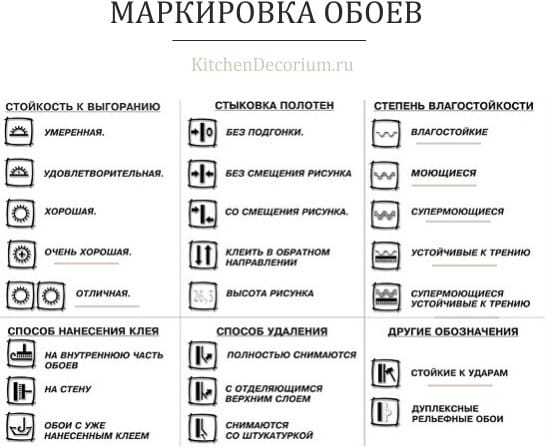
On kitchen wallpaper must be washable, durable, light and moisture resistant. In short, our view:
- The best choice: vinyl non-woven wallpaper. The canvas neatly rests on the walls, looks beautiful and is easy to glue on its own, and in addition, this material is distinguished by high moisture resistance, plus if your walls are not perfectly smooth, this option is most desirable.
- The worst choice: it is better not to glue the wallpaper with paper and textiles, because they are poorly cleaned and deteriorate quickly in the kitchen.
Choosing a design - 7 main secrets
A lot can be said about the topic of choosing a wallpaper in terms of color and pattern, because this question really needs to be carefully considered. After all, we are our own designers, which means that we will have to understand the colors, prints, and the right combinations with furniture and walls in other rooms. The color and design of the paintings is selected depending on the shape, size of the room, its level of natural light, your preferences.
Here are the 7 main rules in choosing wallpaper designs that you need to know:
- For well-lit rooms choose cool shades;
- Kitchens with windows facing north are decorated with wallpaper in warm shades;
- Small kitchens 5.6.7 square meters make out light wallpaper without complex patterns. Valid one accent wall.
- Narrow kitchen will become wider when decorating walls in bright colors and drawing in longitudinal stripes;
- Low ceiling kitchen wall stripes or verticals are shown;
- Win-win and most versatile colors that always look beautiful: white, beige, gray, muted blue;
- Plain wallpaper is not only a tribute to fashion and always appropriate restraint, but also the best option for self-sticking easily and quickly, because they do not require docking patterns.


Tip! You can paste over the walls with different wallpaper, creating interesting interior accents. To avoid problems of choice and doubt, if you want to create such a design yourself, without the help of a designer, you need to choose from any one collection, where all the companion options are already carefully selected.
Properly preparing the wall
Work always begins with the preparation of the walls.
Step 1. The quality result is not ensured if you do not first remove the old wallpaper and putty the wall. All this is not difficult to do with your own hands.
To remove the old wallpaper from the wall, use a metal spatula and a spray gun (wet wallpaper removed from the wall easier). Old coatings - peeling paint and whitewashing - also need to be removed.

Step 2. After this, the walls must be leveled with a putty. Vinyl and non-woven wallpaper can glue the surface with minor defects, but large irregularities, cracks, etc. - must be eliminated.

Tip! Keep in mind that under non-woven wallpaper one layer of putty will suffice, and for vinyl and the more paper ones a smoother surface will be required.
Step 3. The last layer of putty must be sanded.
Step 4. And now you need a primer. After such operations your old walls will not be recognized, and all coatings will be glued to them without difficulty.
For more information on how to properly putty yourself and align the walls under the wallpaper, see the following video:
Cooking tools
Deciding how to glue wallpaper in the kitchen, you can not ignore the question of preparing tools.
To quickly cut the canvas, you need:
- Square;
- Metal rulers are long;
- Wallpaper knife with sharp replaceable blades;
- Good scissors;
- Yardstick.
And for gluing the wallpaper you will need:
- Spray with water, metal spatula - to remove the old layers of wallpaper;
- Plummet, level (normal or laser);
- Rule profile for vertical markup;
- Rollers or brushes to apply glue to the sheets and walls;
- Wide, narrow rollers made of rubber for smoothing cloths;
- Bucket and tray for glue mix;
- Water, clean soft rags or brush.
Getting started - we cut the canvas and prepare the glue
To understand how to properly glue the wallpaper, you must first deal with the cutting roll. There are the following options for cutting:
- Cut along the wall, pre-applying the roll in the right place and marking.
- Cut on the table, once measuring the height of the ceiling and adding to it 10 centimeters in reserve.
- Wallpapers with a pattern are cut according to the step of a repeating pattern - as a rule, this value is indicated on the package, but you can check it by finding duplicate elements.
Tip! If you cut out several paintings at once, do not forget to sign them in the sequence in which they will be glued to the wall.

There is another important point - breeding glue. The adhesive composition is selected in accordance with the type of wallpaper material and diluted with careful observance of instructions in cool water. The composition is mixed until the acquisition of jelly consistency. Read more about the types of glue and its preparation:
How to glue the walls - step by step instructions
So, how to glue wallpaper? The walls are already fully prepared - the old coatings were removed, and the surface was puttied and primed. After the primer has dried, choose the options for applying glue (depending on the type of material used):
- In the case of paper-based vinyl wallpapers, linens are coated with a paper;
- To glue non-woven base wallpaper, glue is applied to the walls.
It is recommended to apply the wallpaper and on the wall and on the canvas - this ensures better adhesion of surfaces, in addition, the alignment of the pattern and alignment of the paintings will be easier.
If you need to put glue on the canvas, and not on the wall, then prepare in advance a clean place for them.
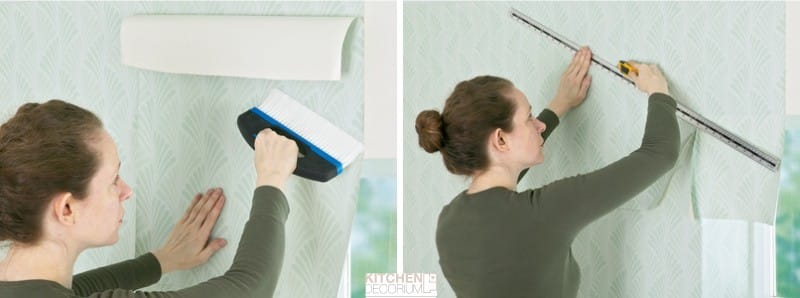
Glue is applied evenly on the wallpaper without gaps, after which the sheets are folded in half and left for a few minutes. Particular attention should be paid to the wall - in the place where the wallpaper will dock (after all, modern materials are glued butt but not overlapped). Start of work should be carried out from the center of the room, if there are 2 windows in it or from the corner of the wall where the window opening is located.

The first canvas is glued just in the corner - so that it enters the next wall by 5-6 cm. Before gluing the first canvas, the vertical along the construction plumb or level is always marked - this line is drawn along the wall with a pencil, as shown in the photo above. Begin to glue the wallpaper on top, aligning the canvas exactly along the vertical line. At the beginning, the top and the edge of the material are exposed, and while clamping, only a rag or brush is used, but not a roller. After the upper part of the canvas is glued, open the lower part and also carefully aligned to the plinth.

After the canvas is aligned and fixed, it is pressed against the “herringbone” pattern, first in the center, and then sideways, moving from top to bottom.
If a microgap is formed between the webs at the butt joints, they can be easily moved. This will be easier if the canvas is missed with the wall. At the final stage, you need to additionally lubricate the joints and walk along them with a short rubber roller for fixing.

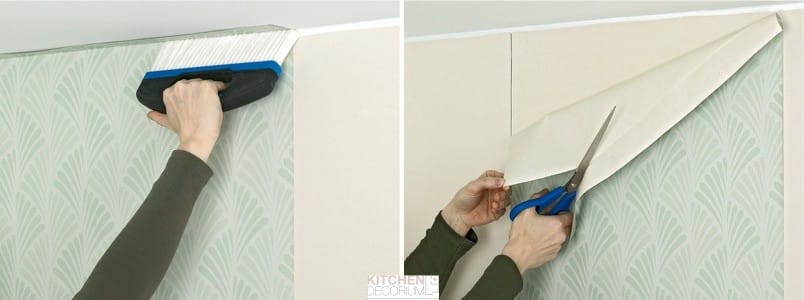
Then follows the quality control of gluing - the wallpaper should fit snugly to the wall without air bubbles. After the whole room is plastered and the canvas dries out a little, you can trim the excess formed at the top and bottom. Here it is important to use a sharp knife so that at the cut point there is no scuffing left or evenly cut with scissors at the bend, as shown in the next photo.
And how to glue the last canvas? Measure the width of the not yet glued section of the wall and add 1.5 - 2 cm to it (photo 1). Cut the canvas to the desired width. Now dock this canvas with the adjacent canvas, glue and iron the seam, and then in the corner, vertically, iron the rag or brush that has formed an overlap (photo 2).

Carefully trim the excess in the corner, top and bottom. Wipe off any glue residue with a sponge. Keep in mind that as a result, the picture may not match perfectly, but it is not very noticeable in the corner.

How to glue wallpaper near the door, windows and corners?
In order to do a beautiful and professional wallpaper glueing with your own hands, you need to pay special attention to the work near the windows and doors in the kitchen. It is not difficult, the main thing is to know how to do it according to the rules and common sense.
How to glue wallpaper near the window?

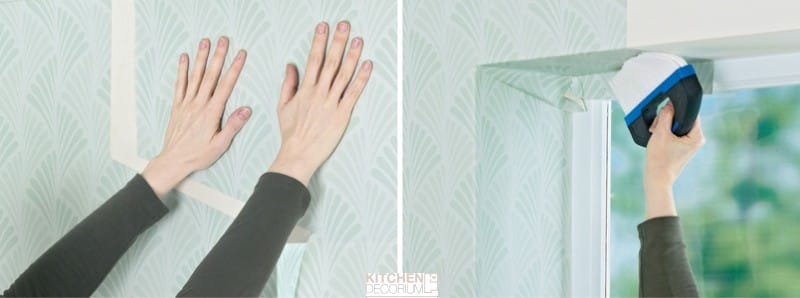
When you get to the window, glue the next section as usual, that is, the canvas will intercede on the window opening. Make horizontal cuts on the canvas, bend and iron the paper as shown in photo 1. If the section of wallpaper does not reach the window, then it is necessary to glue an additional section. Cut the blade with a cutter so that it perfectly framed the window sill (photo 2). Cut off all the excess and iron (photo 3). Now paste over the top of the window opening as shown in the photo.
The side walls and the top can not glue. Just glue the pieces of canvas, joining the picture, and at the edges of the window opening, if necessary, set the corners.
How to paste a wall with wallpaper near the door?
When you get to the door, attach the sheet as usual with entering the door. Cut off the excess (the section that covered the door) with scissors, leaving a few centimeters of extra paper on top and on the sides (photo 1). Then make a small slit diagonally as shown in photo 2.

Cut off the excess paper at the top of the door frame and at the bottom. Use the edge of the door body as a guide.Stroke the wallpaper along the door.

Now we will issue a wall above the door. Hang a short piece of canvas above the door. Dock the pattern and cut off the excess at the ceiling and the top of the door (photo 1). On the other side of the door, paste on the same principle as described above. But do not cut the excess vertically (along the edge of the door body) until you paste the next sheet, so that later you can fix the irregularities.

How to glue wallpaper in the corners?
Internal corners are in any room. They need to be glued as shown in the photo instructions below.

But the protruding angles are not in all kitchens, but in many.

Sticking the curb and wallpaper near sockets, switches, batteries
So, how to glue wallpaper in the kitchen with their own hands, in general, we figured out. And how to properly wallpaper the walls near the battery, outlets and switches? Let's figure it out.
How to glue wallpaper near the battery?
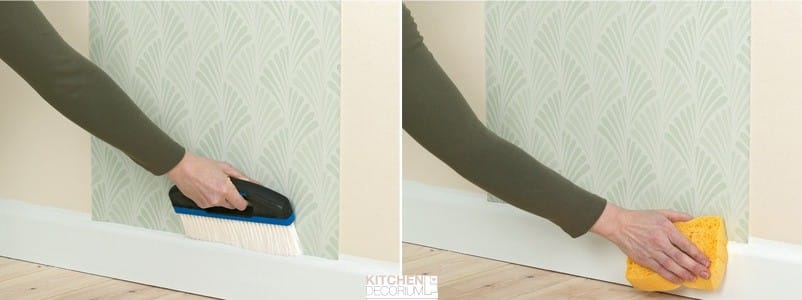
Start wallpapering the wall above the radiator as usual, and after finishing the canvas to the edge of the radiator, let it hang over the radiator surface (photo 1). Then cut the wallpaper so that they go a little beyond the radiator (photo 2). Now roll them over the battery with a roller (photo 3).

How to make wallpaper, where are the sockets and switches?
- Turn off the lights. Hang the paper on the switch panel. Mark the position of the corners of the switch as shown in the figure.
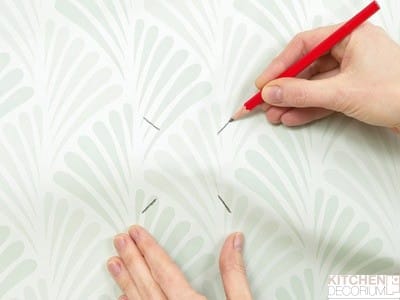
- With a stationery knife, make a diagonal slit from one corner to the opposite corner; four triangular flaps should appear. Fold these patches along the edge of the wall and cut the resulting unnecessary triangles along the fold.
- Loosen the fastening of the switch panel or the socket and pull it out a little through the hole made.
- Iron the paper under the switch panel. Then install it back and remove excess glue. Do not turn on the electricity until it is completely dry.
How to glue the curb?
- Draw pencil control lines on the wall at the height where you want to glue the curb and stick it a little spacing on the adjacent wall. (photo 1);
- On the second wall, glue the curb in the same way so that an overlap appears in the corner, and then carefully cut the top layer of the curb in the corner (image 2).

Well that's all.

 (Rate the material! Already voted:13 average rating: 4,54 from 5)
If you want to learn in more detail how to self-glue the wallpaper in the kitchen in difficult places, look at the video:
- Choosing a wallpaper and background for the kitchen according to all the rules
- Create a unique design in the kitchen - correctly combine the wallpaper
- Photowall-paper for kitchen - receptions and ideas of registration
- How to paint the walls or decorate them with drawings
- Himself a painter - painting the walls in the kitchen