Kitchen can not be imagined without a stove and oven. Today, a stationary oven is being replaced by a modern built-in oven. Embedded type of technology requires proper installation and connection according to the rules. It is worth starting with determining its location.
See also: How to choose an oven in 9 steps
The main types of designs of ovens. Properly place the technique
Built-in oven can be:
- Dependent, that is, installed together with the hob;
- Independent, as a completely separate piece of equipment that you can install in any place of the kitchen.
And the connection of the oven can be made to the electric or gas network.
Attention! If it is possible to connect the oven to the electrical network independently, it is impossible to integrate a gas cabinet without the involvement of specialists.
Installing the oven with your own hands can be done in two ways:
- Traditional, when the oven was installed under the countertop. The top element of this design may be the hob.

- The built-in oven is installed separately from the hob, placing it above the countertop level. This makes it easy to keep track of cooking, simplifies the care of work surfaces, but in this case a closet is needed in which to allocate a niche.
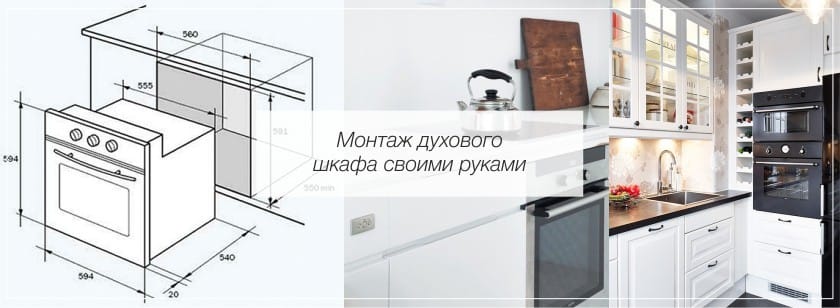
Regardless of where the oven will be installed, the niche must fit a specific size. Today, the dimensions of embedded technology are standardized, you can find models (for example, an oven and microwave) the same size, which can harmoniously complement each other in one wall of the kitchen.

You can buy an oven and a kitchen module for it in the following sequence:
- First, design and order a kitchen set, and then choose an oven for the given dimensions of the future niche (all this can be done in the same salon);

- First you can buy an oven, and then when designing a kitchen wall, specify the dimensions of the model purchased.
Rules for the preparation of furniture niche
After the place and method of installation will be chosen, it is necessary to provide:
- Protection against voltage drops in the general electrical network;
- Grounding;
- Ventilation - you need to build in the oven at a distance of 50 mm from the back wall of the niche, 9-10 cm below, and the gaps on the sides should be about 5 cm.

Installation in 4 steps
How to install a built-in electrical cabinet? The main thing here is to do everything clearly according to the manufacturer’s instructions and observe the safety rules.
Step. 1 Preparation: check the wiring. Basic requirements for the network to which the connection and installation of the electric oven will be carried out:
- Sufficient resistance level;
- High-quality wires whose cross-section corresponds to the declared power of the device;
- Ground wire and grounding system (standard requirements for connecting any household appliances at home);
- A circuit breaker triggered by overloading or device malfunction.
Tip! The magnitude of the current, providing the operation of the machine, is selected individually. This is influenced by the electrical power of the particular model chosen.

To connect the built-in oven in accordance with all safety requirements, you must use a powerful copper wire (indeed, it is better to create a separate branch of the wiring). Since the oven consumes a lot of electricity, you will need special sockets designed for the power indicated in the technical passport.
Other security rules are:
- Wiring on a twist is not allowed.
- Direct connection of wires made from various materials - aluminum and copper - is prohibited.
- To connect the wires, be sure to use screw terminals.
- Connection to the electrical panel must pass through a separate machine.
Step 2. Next, the built-in oven is placed in a special, pre-prepared niche. If the niche has a back wall, then you need to make a hole in it for the wires.

Step 3. Then the oven is inserted into place and securely fixed with screws (supplied in the kit) with a screwdriver or a cross-head screwdriver.

Step 4. It remains only to wash all the internal surfaces of the oven, then calcine it at the maximum temperature (150 - 250 C) for 30 minutes and after cooling, wipe with a damp cloth. The oven is ready for use!
Gas oven
Built-in oven may well be gas. However, such a connection to the network can only be carried out by gas service specialists - all these nuances are carefully controlled by them.
Tip! Before connecting the oven gas supply to the apartment is blocked. Therefore, it is more profitable to install the hob immediately.
The connection process consists in connecting the oven with a pipe that supplies gas to the kitchen using special gas hoses, while the gas source must be located up to 1.2 m from the oven.
Before the final switching on of the equipment, the gas must be checked for switching on - as soon as a characteristic odor appears, the gas supply is again shut off until the troubleshooting is corrected. Upon completion, the equipment is connected to the electrical network (ignition, lighting work from electricity).


 (Rate the material! Already voted:41 average rating: 3,71 from 5)
- Choosing built-in appliances for the kitchen
- Choosing a gas oven - crib for the buyer of 7 steps
- All the nuances of choosing a gas hob
- 4 stages of choosing a built-in refrigerator and the nuances of its installation
- Choosing a hob: what you need to know before you buy
- Broke the dishwasher - can I fix it myself?
"Ventilation - you need to build in the oven at a distance of 50 mm from the back wall of the niche, 9-10 cm from the bottom, and the gaps on each side should be about 5 cm." In millimeters, only all sizes, according to the diagrams, even this is visible, otherwise the oven should not be fixed.